
Upgrade options
Available onEstimatorBuilder
Upgrade options are the choices a client can make on top of your standard house: 3.0 m ceilings instead of 2.7 m, tiles to the ceiling in the ensuite, stone benchtops, ducted air conditioning. You set them up once on the design’s estimate. Each upgrade’s price is worked out once and saved, so a salesperson can add any mix of them up in front of the client straight away on the Upgrades page.
The price comes from your own estimate. Taller walls change the frames, the plasterboard, the paint and the tiles, and the upgrade’s price includes all of them.
Opening it
Section titled “Opening it”In the BOQ, press Upgrade options in the page header, beside Assemblies and Measurements. The Upgrades button on the ribbon opens the same window. For more room, press Open in a new tab: the same options on a page of their own.
How it is laid out
Section titled “How it is laid out”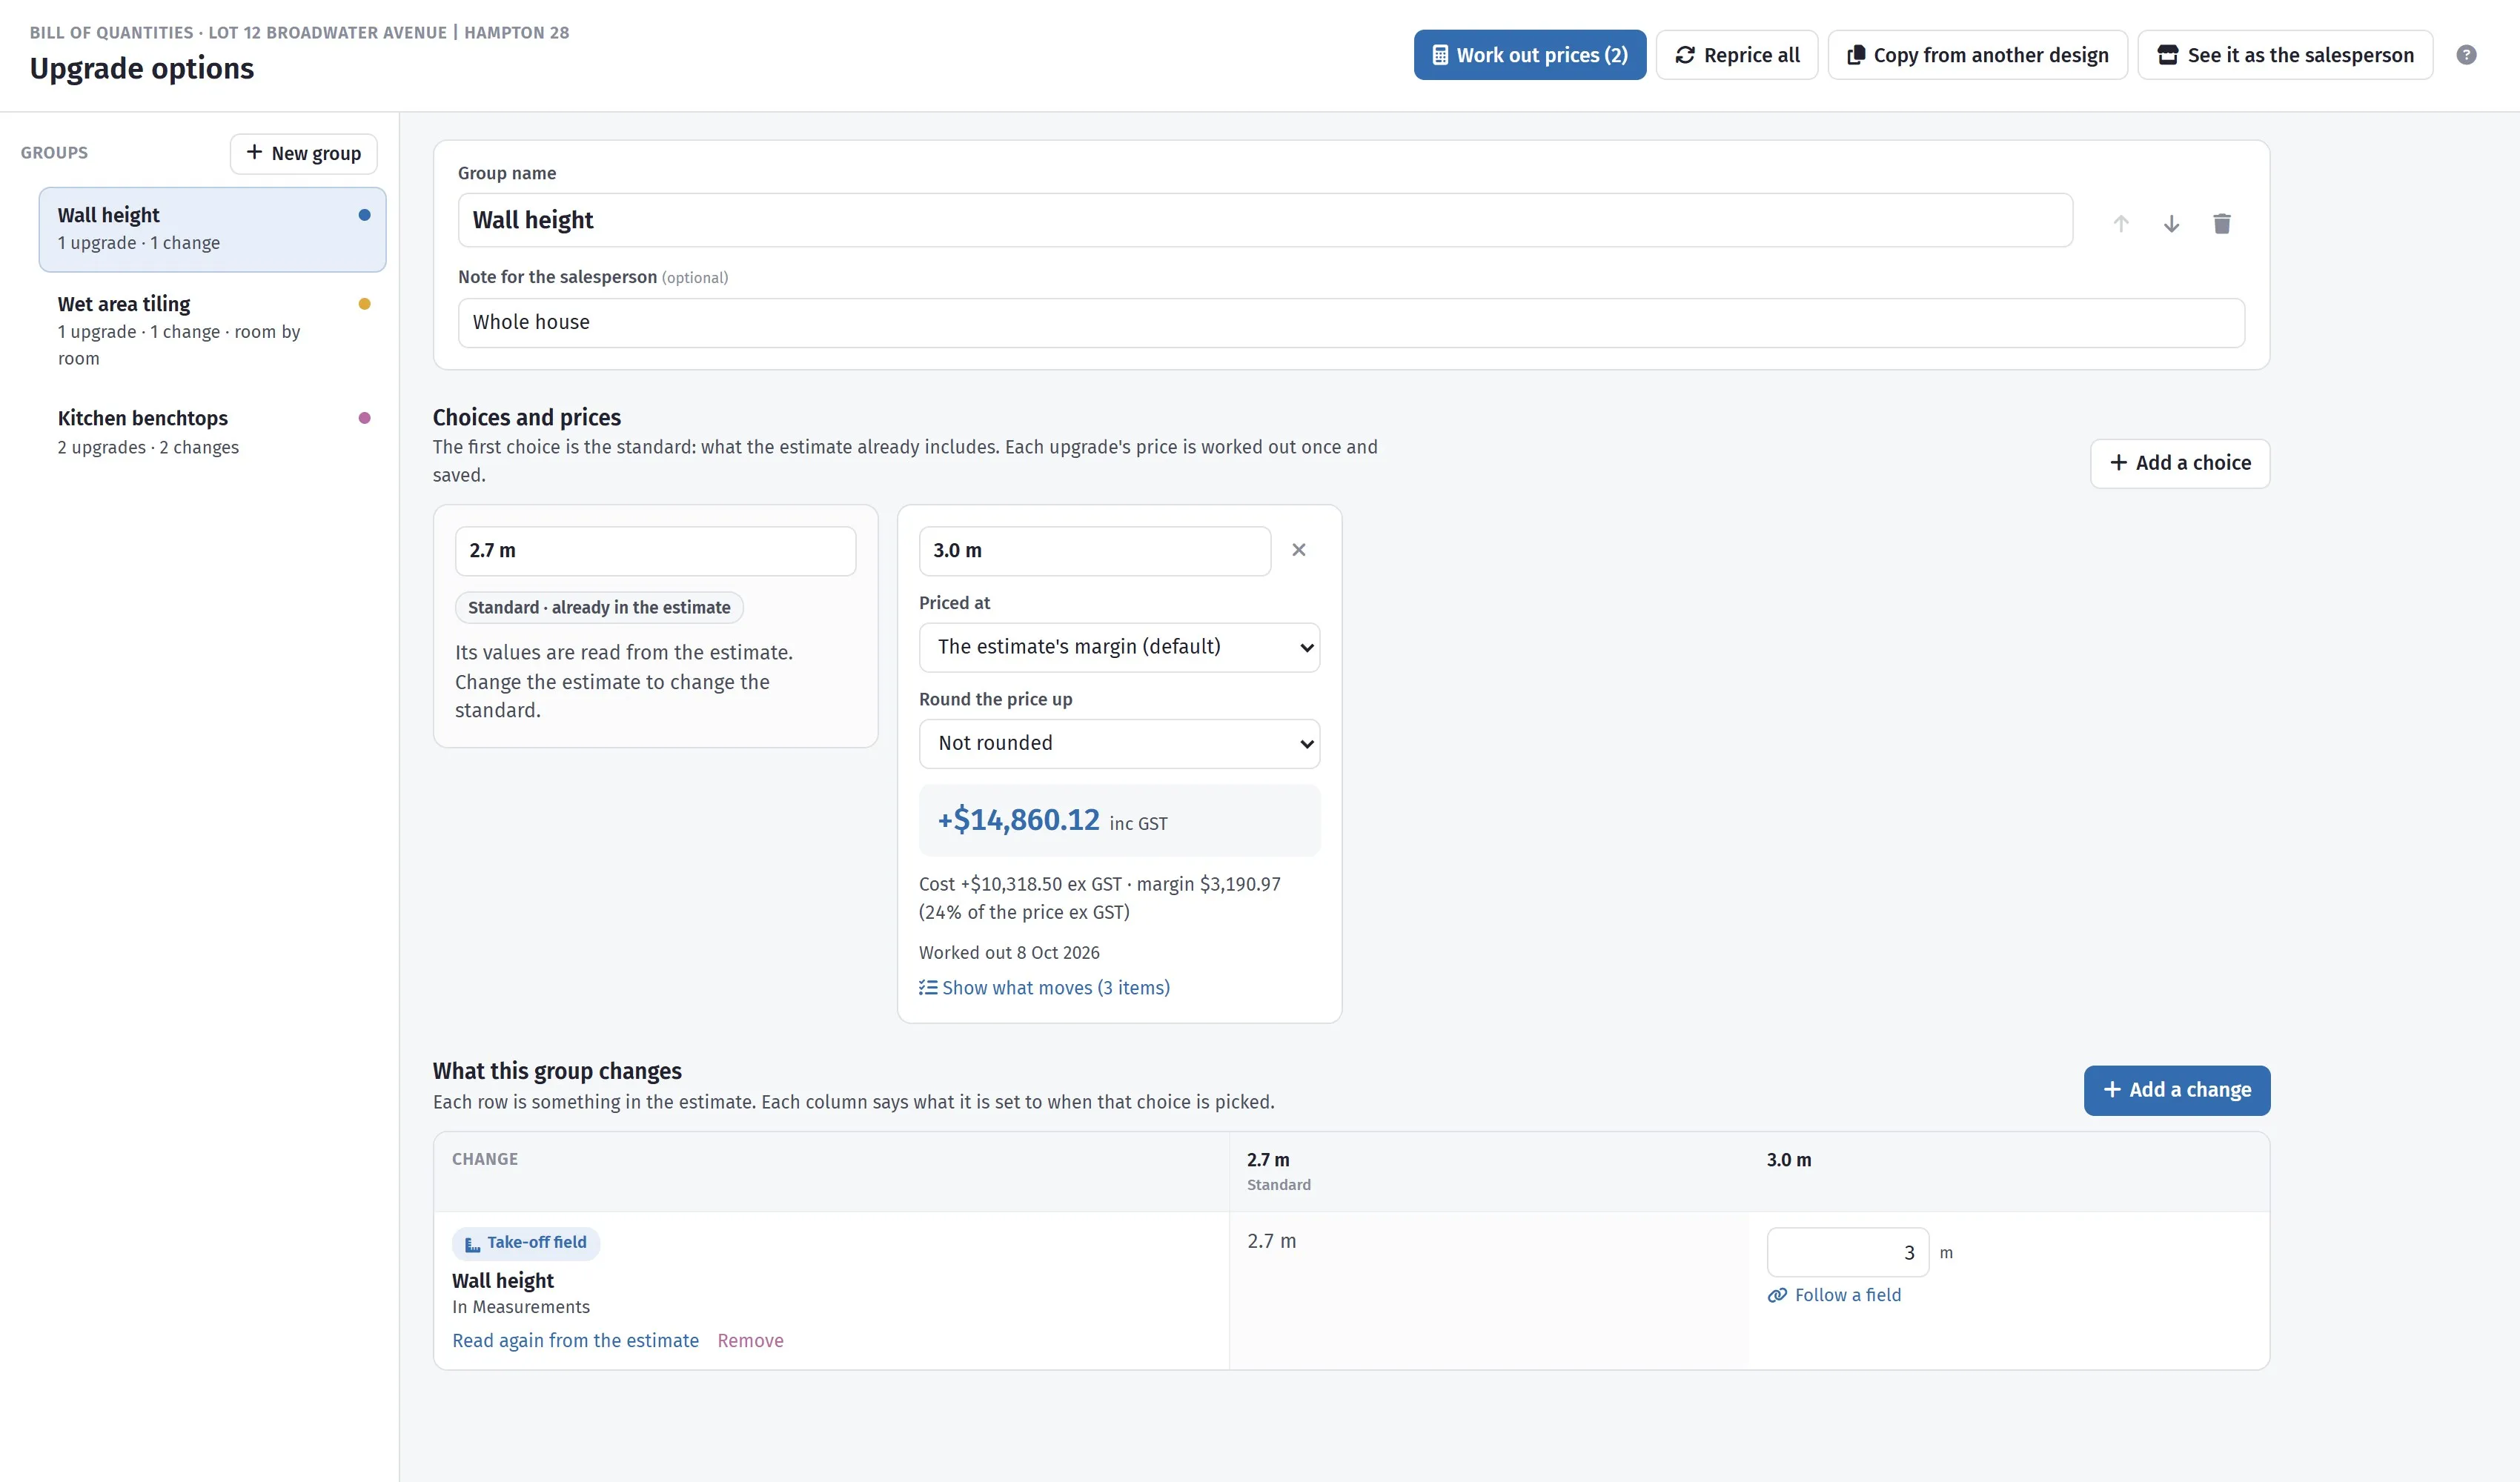
One group is one decision. The first choice is the standard — what the estimate already has — and each upgrade beside it carries its own worked-out price, with the cost and margin behind it for anyone allowed to see them. What this group changes is the other half: one row per thing in the estimate, one column per choice.
- Groups on the left. A group is one decision the client makes: Wall height, Wet area tiling, Kitchen benchtops. A coloured dot shows a group whose prices are all worked out (blue), one with a price still to work out (amber), or one with a change that needs a look (pink).
- Choices and prices. One card per answer: 2.7 m, 3.0 m. The first is always the standard, which is what the estimate already includes. Each upgrade’s card shows how it is priced and its saved price.
- What this group changes. A table: each row is something in the estimate, each column says what it is set to when that choice is picked.
To change the order, drag a group by the handle that shows when you point at it, or drag a change by its number. The sales page and the client portal show the groups in the same order. You can also focus a handle and press the up and down arrow keys. Moving things around never puts a price out of date.
A choice says what the estimate should look like with it, not how much to add. Going back to the standard puts the estimate back exactly as it was.
What a group can change
Section titled “What a group can change”| Change | What it is | Example |
|---|---|---|
| Take-off field | A typed measurement for the whole house | Wall height 2.7 → 3.0 |
| Room by room | A question on an assembly’s take-off sheet, answered per room | Tile height 1.2 in the Ensuite and Bathroom → 2.7 |
| Product | Swap an item’s product for another of its own products | Laminate benchtop → 20 mm stone |
| Item in or out | Put an item in the price or take it out | Ducted air in, split systems out |
One group can make several changes at once. Ducted air conditioning can take out the split systems and put in the ducted unit and its outlets.
A field that is measured on plans, or worked out by a formula, can’t be a change: its value comes from somewhere else. The list shows these under Can’t be used, with the reason. Change the thing it comes from instead.
Room by room
Section titled “Room by room”Use it for upgrades a client may want in some rooms and not others: tiles to the ceiling in the ensuite but not the laundry. It works on an assembly’s take-off sheet whose lines are rooms (Ensuite, Bathroom, Laundry) and a question such as tile height.
- The upgrade sets that question to its value, but only in the rooms the salesperson ticks. Applies to can instead make it always cover every room.
- Each room keeps its own standard answer, so a laundry tiled to 0.6 m stays at 0.6 m when the client upgrades only the ensuite.
- The price is saved room by room, so ticking a room adds its price.
Where the rooms come from
Section titled “Where the rooms come from”A room is a line on an assembly’s take-off sheet. The room’s name is that line’s What it is; a line with nothing typed there shows as Line 1, Line 2. The Room by room change points at one question on that sheet — Tile height, say — and each line’s answer to it is that room’s standard.
To add a room to an estimate that already has a sheet:
- In the BOQ header, press Measurements.
- Find the sheet in the list on the left — it is an assembly, such as Wet areas — and press Open take-off sheet.
- On the Measure tab, press Add line. Type the room’s name in What it is (Ensuite, WC), then fill in its answers across the row.
- Close the sheet and open Upgrade options. The room is there.
You do not have to tell Upgrade options about it. Every time Upgrade options, the sales page or the client portal opens, it re-reads the sheet: a new line becomes a room, a deleted line goes, a renamed line is renamed. Read again from the estimate on the change refreshes each room’s standard answer.
If the estimate has no sheet yet
Section titled “If the estimate has no sheet yet”Most estimates measure wet areas with typed fields rather than a sheet, and those cannot be split by room. Build one once:
- Measurements → New to make the sheet, then open its take-off sheet.
- Questions tab → New question for each answer a room has. Give each a short name for
formulas to use:
Pfor Perimeter (m),Hfor Tile height (m). - Measure tab → Add line for each room, named in What it is.
- Measurements tab → New measurement for the total — Tile area, formula
{P} * {H}— which adds the lines up. - Point the tile items at it: on each item, Calculate Item Quantity → from a take-off field → that measurement.
That last step is what makes the room answers drive the price. Without it the sheet is just numbers on a page.
Setting up a group
Section titled “Setting up a group”- Press New group and name it the way a client would say it.
- Press Add a change. In the panel, choose the kind of change, then search for the field, question or item and click it. Every choice starts with today’s value.
- In each upgrade’s column of the table, type what that choice changes it to. For a product change, each cell shows the product with its description. Click it to open Choose the product, which lists every product of the item with its description, maker, code, colour and price, and marks the one the estimate has now.
- Rename the choices, and add more with Add a choice (20 mm stone, 40 mm stone).
- Choose how each upgrade is priced (below), then press Work out the price. SmarteBuild works it out on a throwaway copy of the estimate, saves it, and lists every item that moved. Nothing on the estimate changes.
Show what moves on a card opens a window listing every item the upgrade changes, one row each: the item, its description and cost code, what changes (quantity, product, or in or out of the price), the quantity and product before and after, and, if you can see costs, the rate, the line cost before and after, and the change. The biggest change is first. Filter by kind of change, or search for an item, cost code or product. A price worked out before 8 October 2026 shows only a short list: press Work it out again to see the full detail.
Work out prices at the top works out every price that is missing or out of date, in every group. Each takes a few seconds; after that it is saved and the salesperson never waits for it.
Reprice all at the top works out every upgrade price again from today’s estimate, even the ones that are up to date. Use it after a big change to the estimate, such as new supplier prices or re-measured plans. It asks first, because it takes a few seconds for each upgrade.
How an upgrade is priced
Section titled “How an upgrade is priced”Each upgrade’s Priced at has three kinds of choice:
- The estimate’s margin (the default): the change in the estimate’s sell price, with the same item markups and margins as the rest of the house.
- A variation markup on the cost: the cost change plus one of the markups you use on variations, plus GST.
- A fixed price that you type, including GST. Use it when you sell an upgrade at a set figure whatever it costs on this house. The card shows what the estimate’s margin would have made it, so you can see what the fixed price leaves you.
Round the price up (not for fixed prices) rounds the worked-out price up to the next dollar, $10, $100 or $1,000. For example $6,406.75 rounded up to the next $100 is $6,500. It always rounds up, never down, so rounding never costs you margin.
With permission to see costs and margins, each card also shows the cost change and the margin, and warns when a price is below cost. Changing Priced at needs no new working out: the saved cost is reused.
When a price is out of date
Section titled “When a price is out of date”A saved price is marked Out of date when:
- you change the group (its changes, values or rooms), or
- before the contract, the estimate’s rates change: item costs, product prices, markups, margins or GST.
Press Work it out again. A copied job keeps its saved prices: same set-up and same rates, so they are still right. The salesperson is asked to work out-of-date prices out again before a proposal is sent for signing.
Upgrades that depend on each other
Section titled “Upgrades that depend on each other”Some upgrades change each other. Floor-to-ceiling tiles cost more when the client also picks 3.0 m walls, because the tiles go higher.
Linked by the estimate’s formulas. If an item’s formula reads a field that another upgrade changes (the tiles’ quantity reads Ceiling height, say), SmarteBuild finds the link by itself when it works out the prices. It then prices the group for each choice of the other group, as it does for a followed field. The group’s page says The estimate’s formulas link this group to Wall height. The link always runs the same way, whichever price is worked out first. A group that changes take-off fields or rooms’ answers (ceiling height) comes first, and a group whose items read them (tiles in or out, the tile product) follows it. When both change take-off answers, the group lower in the list follows the one above it, so drag your groups into order. A link is never used both ways round, so the difference is never counted twice.
Every formula is worked out first. Before an upgrade is priced, every take-off sheet and every item formula in the pricing copy of the estimate is worked out afresh. An item formula that can’t be worked out (a division by zero, for example) is skipped; the others are still worked out. Before, one broken formula stopped the rest.
When every room of a room-by-room upgrade is picked, the price is the one worked out with all the rooms together. Rooms priced one at a time don’t always add up to it exactly, because some quantities round up to whole boxes or sheets.
Follow a field. In a group’s table, a number under an upgrade choice (a take-off field or a room’s answer) has a Follow a field link under it. It opens a window with the take-off sheets on the left and every field of the estimate on the right, with its value today. Search, or pick a sheet, then click the field (or use the arrow keys and Enter). The number then follows that take-off field instead. Changes to products and to items in or out of the price have no number, so they have no link. For example, set the floor-to-ceiling tile height to follow Measurements · Ceiling height. The cell then shows = Measurements · Ceiling height; press × to go back to a typed number.
When a group follows another group’s field:
- its prices are worked out once for each choice of the other group. The card lists them, for example With Wall height: 2.7 m +$6,406.75 · 3.0 m +$7,431.83;
- the sales page and the client portal use the right one for what the client picked;
- when the upgrades are applied to the estimate, the other group goes first, so the tiles are worked out from the new ceiling height.
A group can follow one other group, not a chain. Group A can follow group B, but not when B follows a third group.
The together check. The sales page also checks the price with every picked upgrade worked out together on the estimate. It takes a second or two. If the result differs from the sum of the upgrades, the price shows a line Effect of choosing these together, and the total includes it. This catches anything the follow links don’t, such as two upgrades that touch the same item.
Keeping it right
Section titled “Keeping it right”- Read again from the estimate takes the standard from the estimate as it is now. Use it after you change the estimate the standard came from.
- A change marked with a warning no longer works: the item was deleted, or the field now has a formula. Remove it, or point the group at the new thing.
- Copy from another design brings groups across from another estimate you can open. Changes are matched by name: the take-off field, the question on the take-off sheet, and the item. Anything that can’t be matched is listed so you can add it by hand.
- Duplicating an estimate (a new job from a design, or a template) copies its upgrade options and their saved prices with it.
Watch for
Section titled “Watch for”- Upgrades only move what the estimate is wired to. If tiles are a typed quantity rather than perimeter × tile height on a take-off sheet, a tile-height upgrade has nothing to change. Build the design with assemblies and measurements first.
- One thing can only be changed by one group, or two groups would undo each other.
- Setting up options needs Add and edit items on the BOQ. A locked estimate shows them read-only.