
Client tender
Available onEstimatorBuilder
The client tender is the document you send the client with your price. SmarteBuild builds it from the estimate, so the scope, the price and the allowances always match the bill. You change the wording on screen, then print it or save it as a PDF.
It has, in this order:
- a cover with your logo, the job, the client, the date, the price and a picture of the house (a façade render looks best)
- a covering letter
- plans and design: the plans the price is based on, the floor areas and the design details
- the scope of work, grouped by building stage
- the specification: the items in the job’s specification, with their products and pictures
- the tender price, with a figure for each stage
- the provisional sums (PS) and prime cost (PC) allowances, with product pictures
- the colour selections, with their pictures
- pictures you choose from the job’s documents (plans, renders, site photos)
- inclusions, exclusions and notes
- terms and payment stages
- numbered terms and conditions
- an acceptance block for the client to sign
Leave any of them out with the eye beside it in the list of sections.
Opening it
Section titled “Opening it”- In the BOQ: the Reports tab on the ribbon, then Client tender.
- On the Projects page: open the estimate and click Client tender.
It opens in a new browser tab. You need permission to see the sell price (See markup, margin and sell price). Without permission to edit items you can read and print the tender, but not change it.
Changing it
Section titled “Changing it”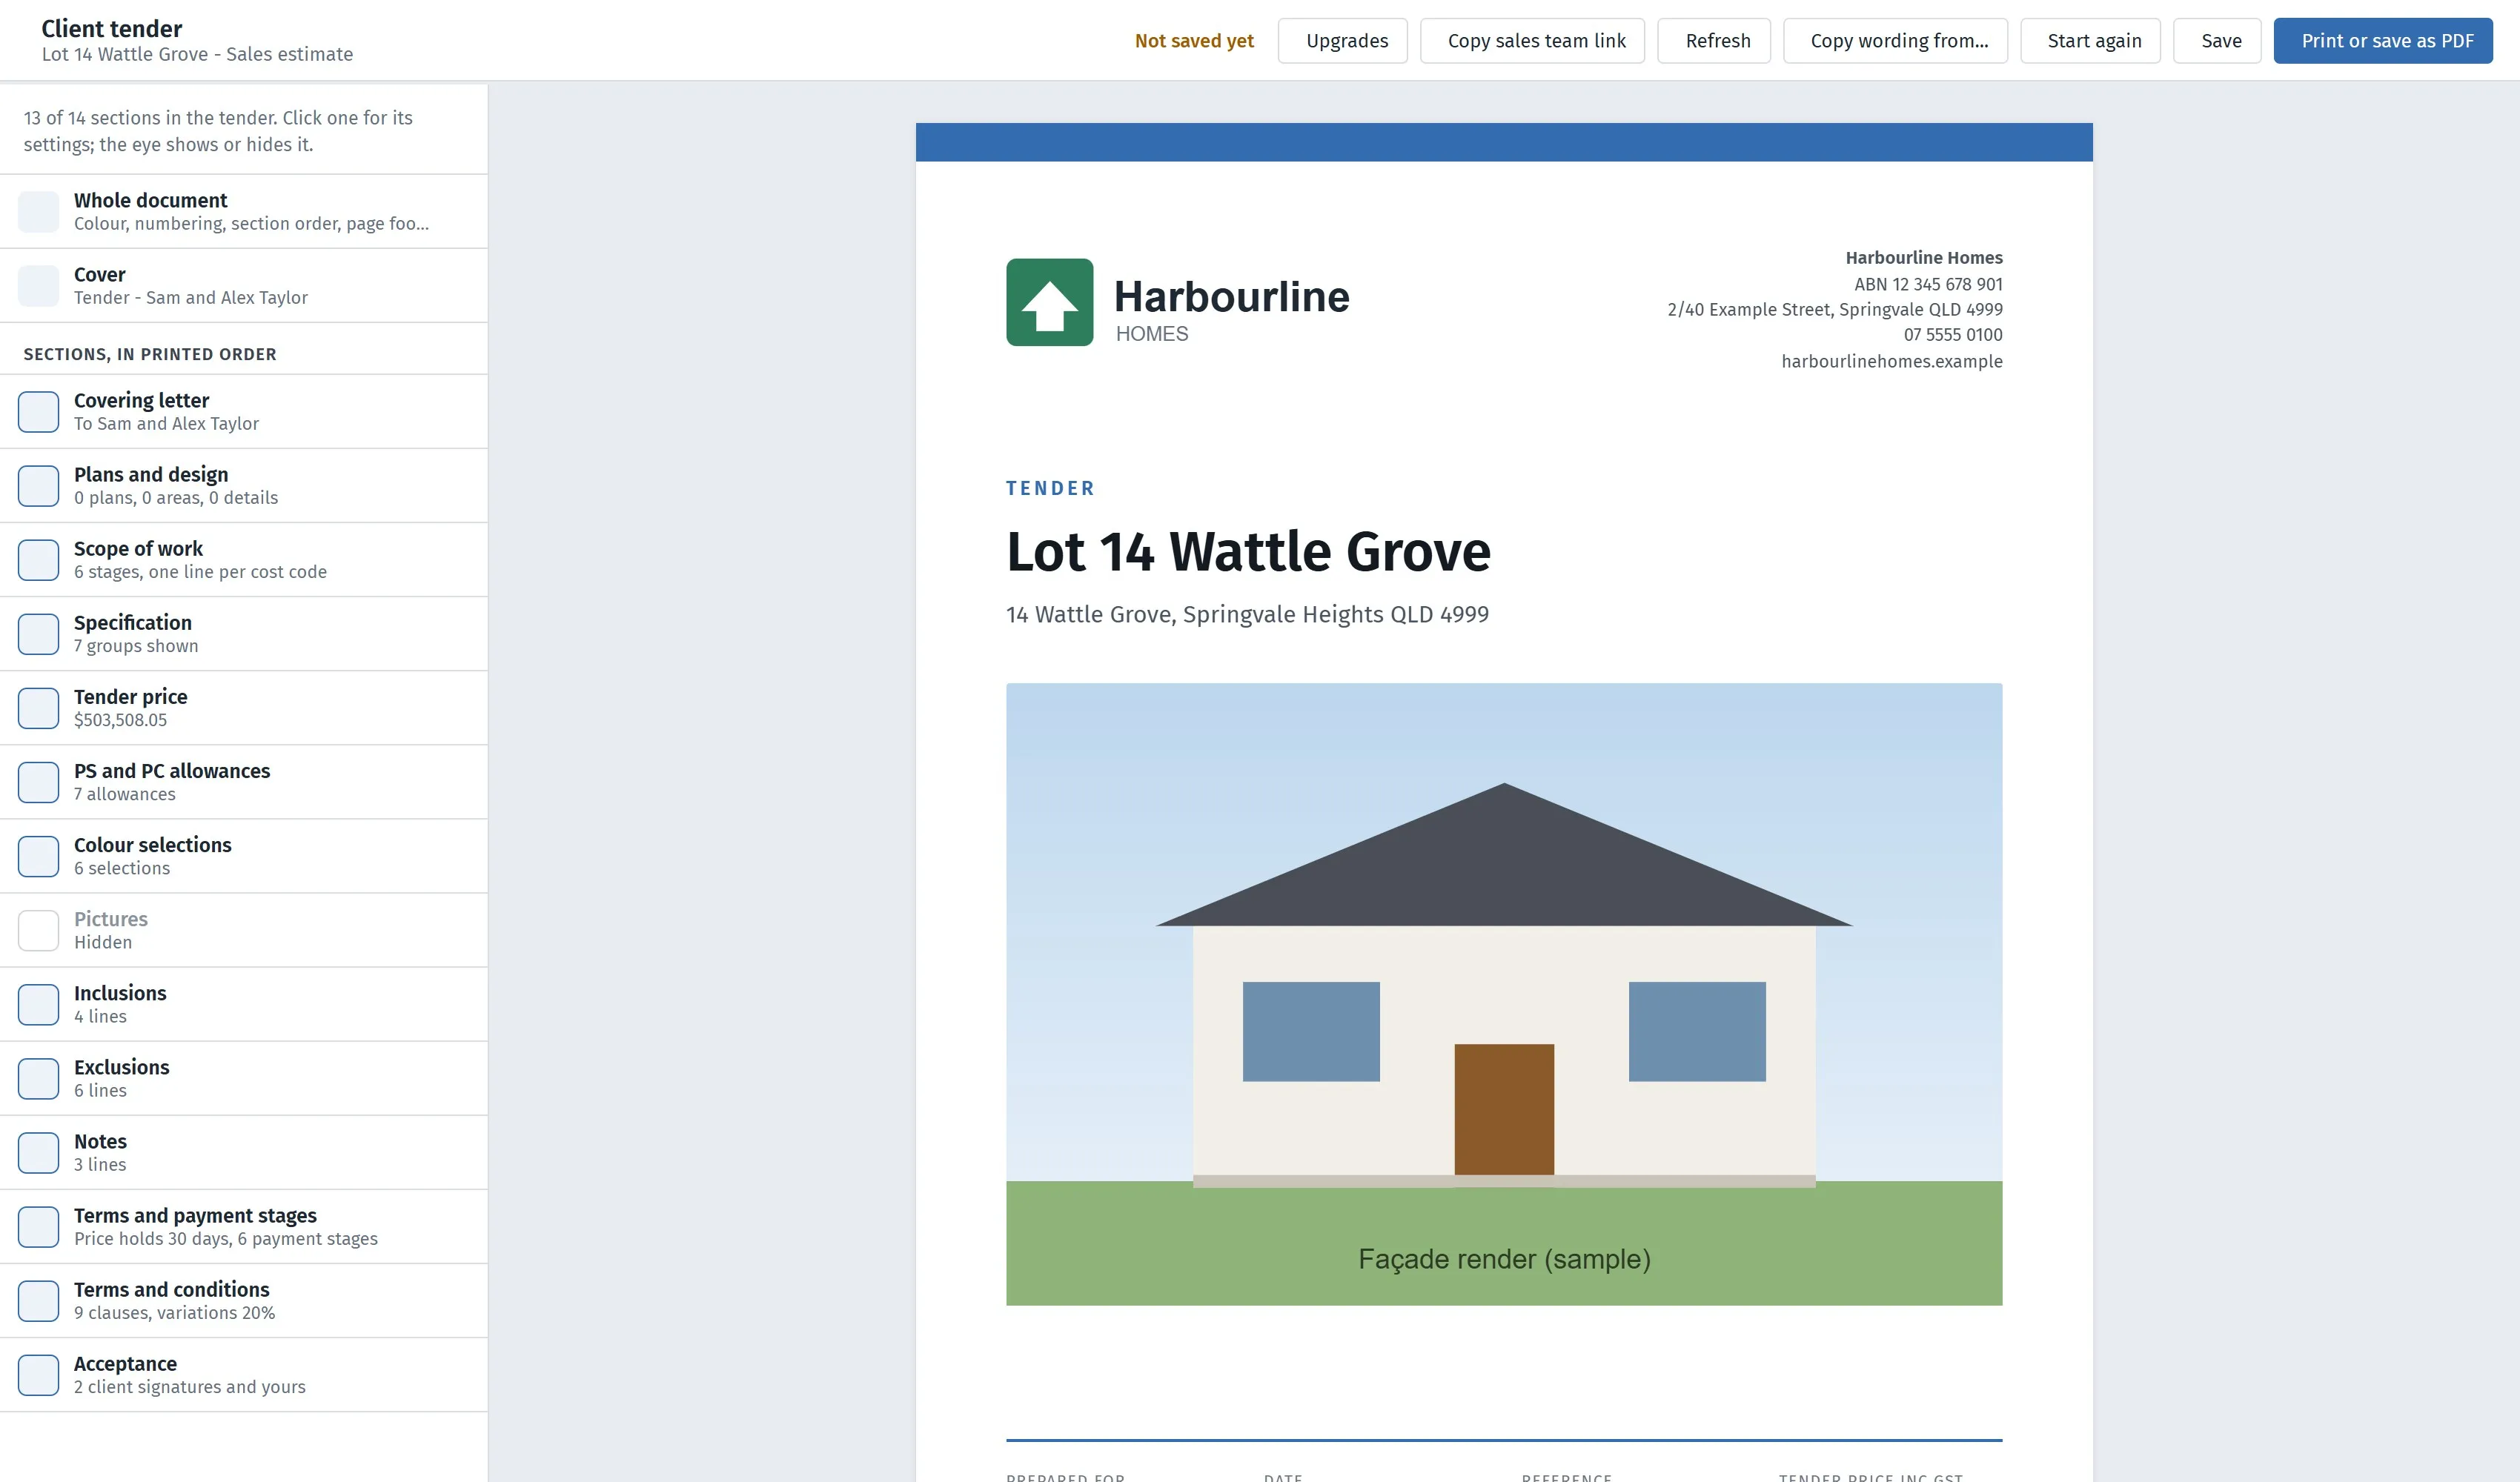
Every part of the tender in the order it prints, each with a line saying what is in it — six stages, seven allowances, nine clauses. The eye hides a section: Pictures is hidden here, so none are printed. Click a row to open just that section’s settings.
The panel beside the document lists the tender’s parts: Whole document, Cover, then every section in the order it prints. Each row has an eye to show or hide that section and a line saying what is in it.
Click a row and only that section’s settings open, with < All sections to come back and a Shown / Hidden switch at the top. The document scrolls to that section and highlights it, so you can always see what you are changing. Clicking a heading in the document — or its settings button when you point at it — opens the same page.
A hidden section shows in the document as a slim grey bar with a Show button. The bar is only on screen; it never prints.
Every section page begins with Layout: your own Heading for that section, and Start on a new page.
- Click any text in the document to change it: the letter, the words under each stage, the inclusions, the exclusions, the notes, the terms. Click away (or press Esc) when you are done.
- Scope lines: click a line to reword it. Point at a line and click the eye to leave it out. The Scope of work page can bring hidden lines back, or undo your rewording. Only items in the price are listed. Items with the same name in a stage (one “Brick Lintels” item per opening, say) are listed once.
- Inclusions, exclusions and notes: one per line.
Whole document holds the settings that are not about one section: the colour, Number every line, the page footer, and Section order — move sections up and down, or press Standard order to put them back.
Press Save (or Ctrl+S) to keep your changes for this estimate. Next time you open it, your wording is there. The prices, items and pictures always come fresh from the estimate.
Refresh fetches the estimate again without leaving the page — new pictures in Documents, colour selections, the specification, prices, items, drawings — and keeps everything you have typed and chosen, saved or not. Only what can no longer apply drops out: a picture deleted from Documents, or a cost code list taken off the estimate. Use it after changing the estimate in another tab rather than closing and reopening the tender.
Stages
Section titled “Stages”The price and the scope of work are shown by building stage. SmarteBuild groups your cost codes into stages for you:
- cost codes numbered by stage (10-120, 20-140, 3.40.150 and so on) are grouped by their first number
- an alphabetical list is grouped by what each cost code’s name says
- each group is named for what is in it, such as “Frame” or “Lock-up”
On the Tender price page you can rename a stage, move it up or down, add one, or remove an empty one. Open Cost codes to move a cost code to another stage. Group again starts the grouping over.
The stage figures always add up to the tender price exactly. Item prices are never shown.
Grouping by another cost code list. An estimate can have more than one cost code list, and an item can be filed under a cost code in each. To group the tender your own way (say Base, Frame, Lock-up, Fixing and Completion), add a list with those cost codes to the estimate, file the items under it in the BOQ, then choose it under Group the price and scope by in the Price panel. The price and the scope of work are then grouped by that list’s cost codes, and any item not filed under it shows as Other work. Changing the list starts the stages again.
Scope of work
Section titled “Scope of work”Open Scope of work in the panel to choose how much the scope lists. What it lists has three choices:
| Choice | What the client sees |
|---|---|
| One line per cost code | Each cost code with priced items as one line: its name, and under it, smaller and in grey, the words you write for the client. This is where every new tender starts. |
| Every item under its stage | Every priced item, grouped by stage. |
| Only the words you write for each stage | Your own paragraph for each stage, and nothing else. |
The words under a cost code belong to the cost code. Click under the name to write them, in any tender. Every tender whose estimate uses that cost code list then shows the same words, so you write them once. To reword a cost code’s name for one tender only, click the name. Writing these words needs the permission to edit cost codes. A cost code list shared from another company shows its words, but you can’t change them.
Point at a cost code line for its buttons: list its items under it, $ to show the whole cost code as a priced upgrade, and the eye to leave it out.
Leave out keeps the scope short without touching the price:
- items that are in the Specification section
- PS and PC items (they are listed under Allowances)
- items of the cost types you choose, such as Labour or Fee
- items worth less than an amount you set, inc GST
Prices never change, only what is listed, and a priced upgrade is always listed. A new tender starts with the first two ticked. A tender saved before these choices existed keeps listing everything until you change it.
Cost codes lists every cost code the scope shows, each under its parents, with an eye on each. One click hides a whole cost code, in either listing. The eye on a parent cost code hides it and everything under it; those show greyed (“Hidden with” the parent) until the parent is shown again.
Copy wording from… brings these choices across from another tender too.
Specification
Section titled “Specification”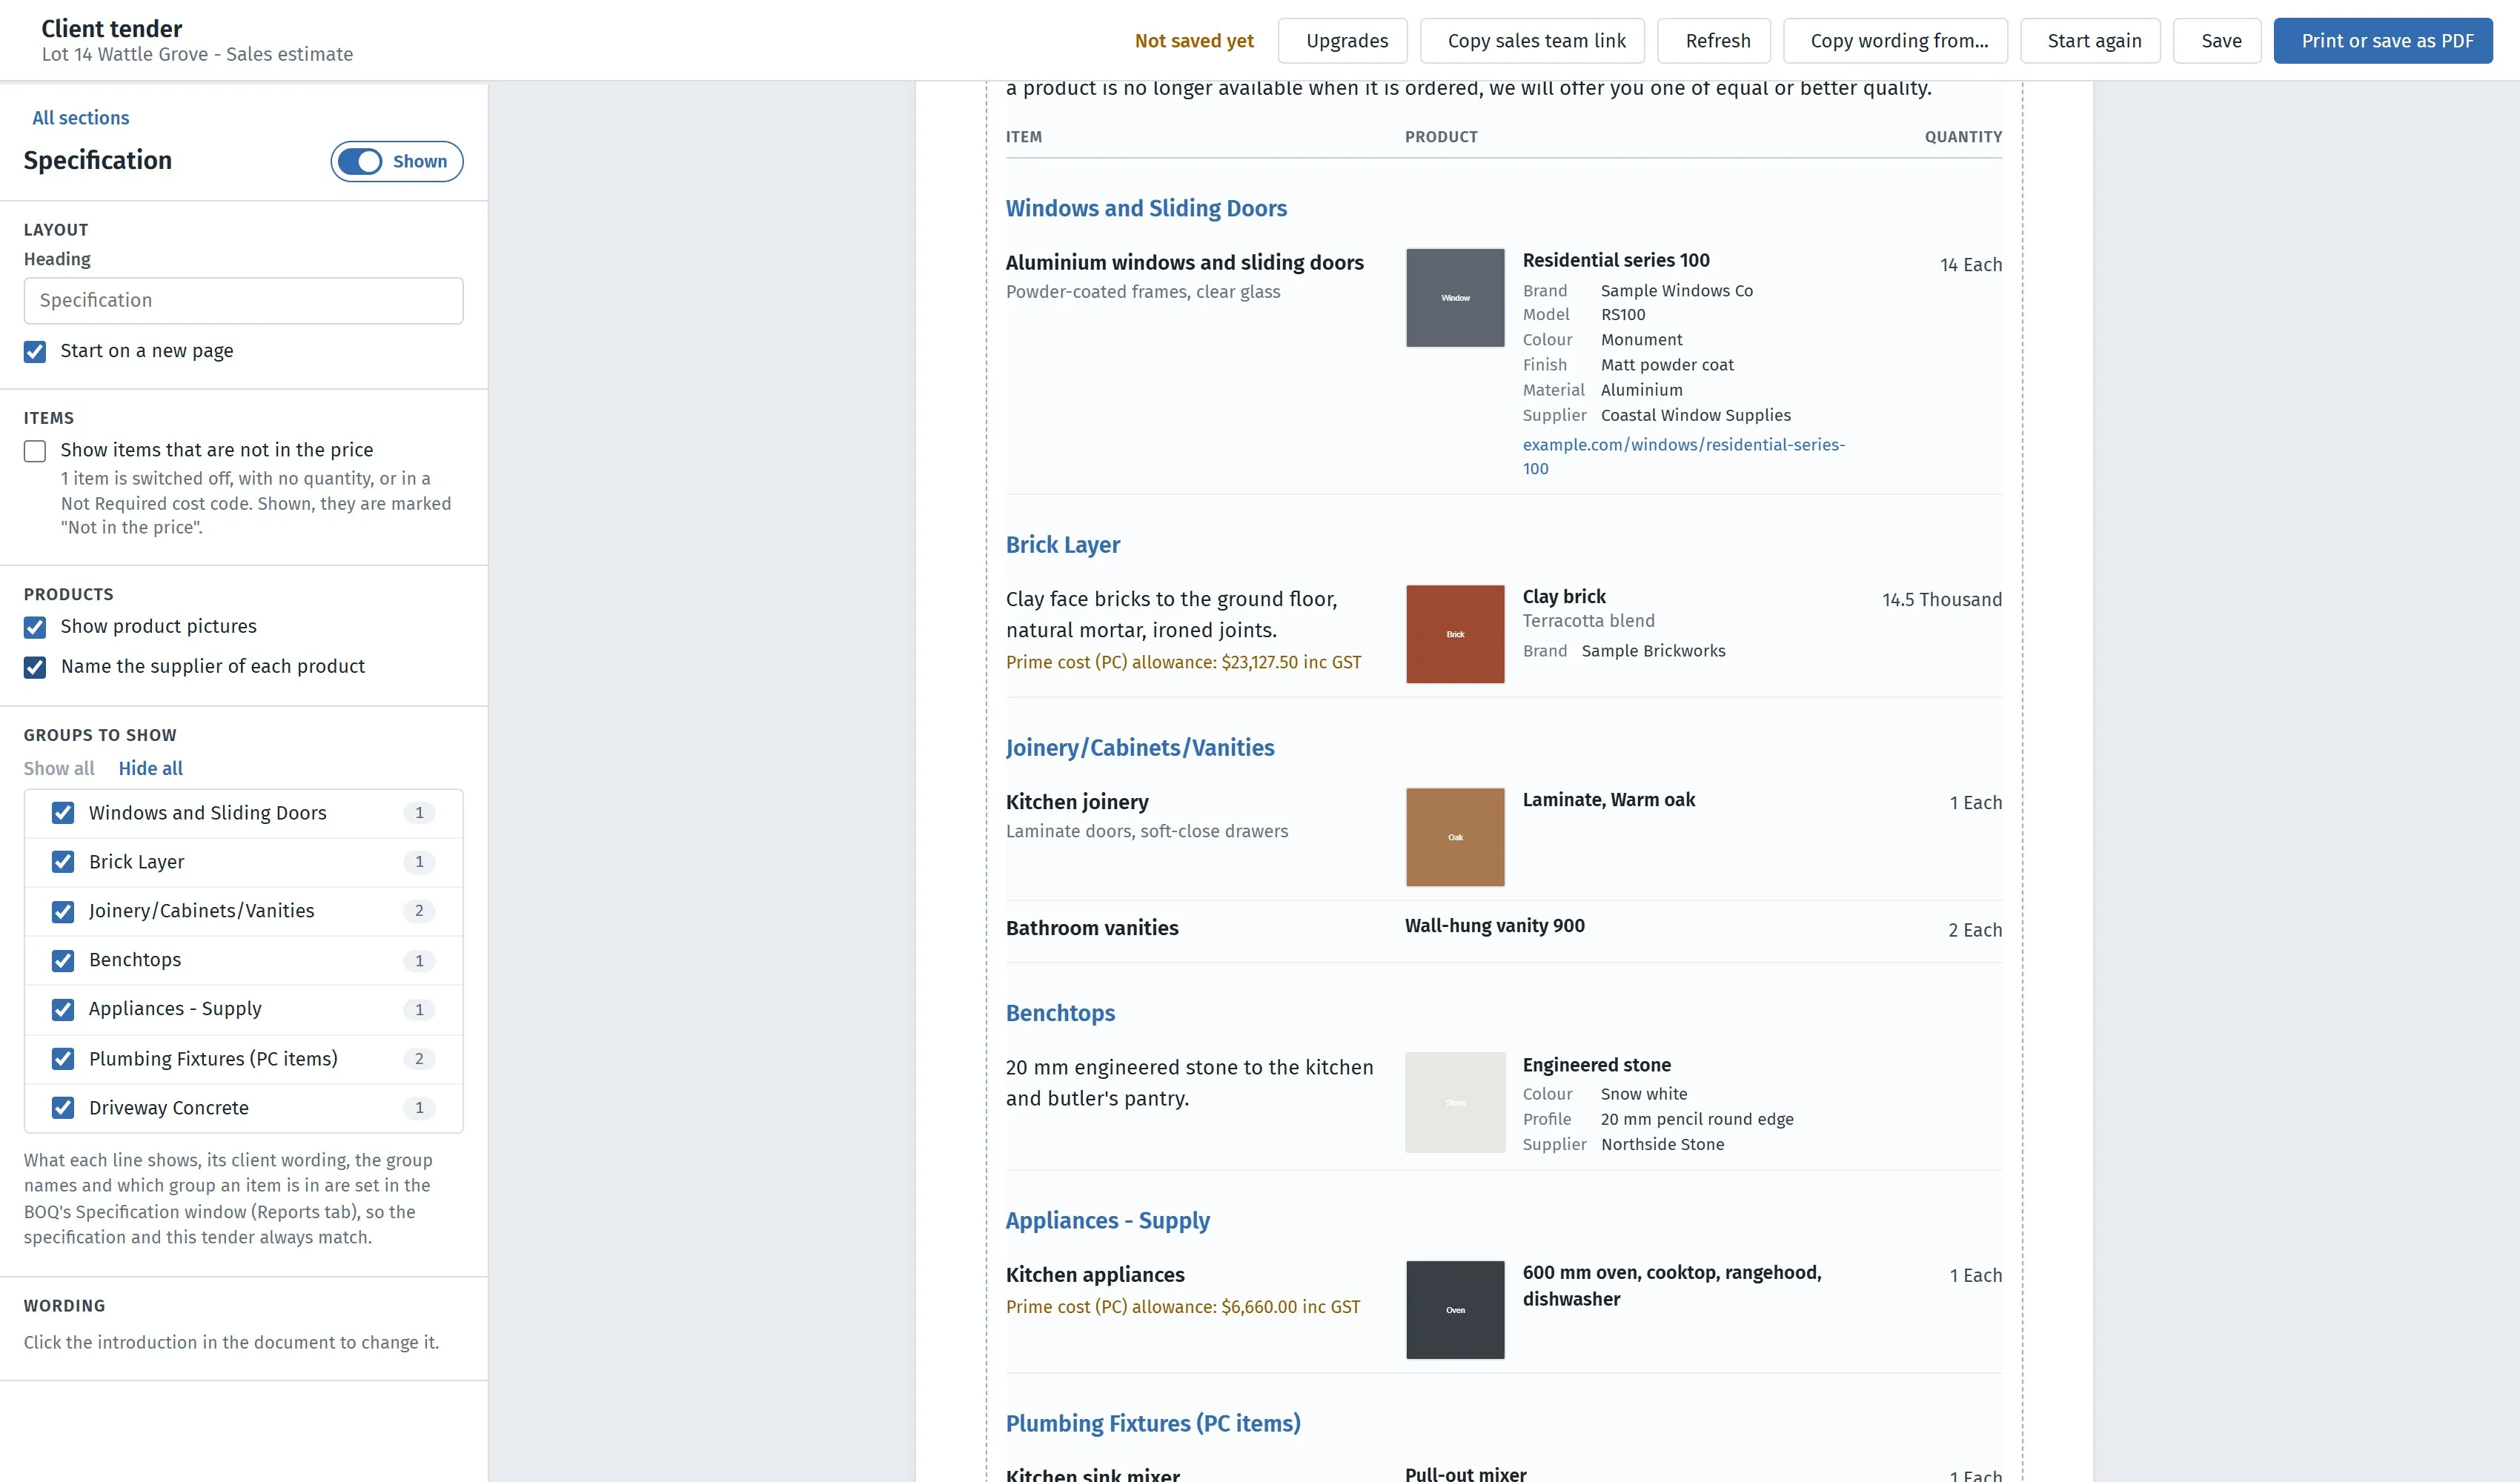
Each line carries the item, the product and the quantity. The product column holds whatever you have recorded — brand, model, colour, finish, material and a link — and Name the supplier of each product adds the supplier row shown here.
The Specification section lists the items in the job’s specification, grouped by cost code. A group you renamed in the Specification window shows its new name here too, and an item you moved to another group there shows under that group. Each line shows what you switched on for it in the Specification window: the item (or your client wording), the product, the quantity and the allowance. Change those in that window, so the specification and the tender always match.
On the Specification page:
- Groups to show: untick a cost code to leave its items out. Show all and Hide all do every group at once.
- Show items that are not in the price: off to start with, so only items in the price are shown. An item is not in the price when it is switched off in the estimate, has no quantity, or is only in a Not Required cost code. Tick it to show those items too, marked Not in the price. The box says how many there are.
- Show product pictures: a picture beside each product that has one.
- Name the supplier of each product: off to start with, in case you would rather the client did not see who supplies it.
When an item has a product chosen for it, the product gets a column of its own: its name and description, then the brand, model, SKU, colour, finish, material and profile (whichever are filled in), and a link to the product’s page. The price and your own notes on the product are never shown.
To take an item out of the tender, point at it and click the bin. It is greyed out and left out when you print, and it stays in the job’s specification. Click the arrow on it, or Put back the removed items on that page, to bring it back.
An allowance shows its amount the same way as the allowances section: at cost or at sell price, including GST.
To leave the whole section out, use the eye beside Specification in the list. If the job has no specification yet, put items in it from the BOQ first: tick them, then Actions > Add to Specification.
Plans and design
Section titled “Plans and design”List what the price is based on on the Plans and design page:
- Plans: click Add beside a drawing from the job’s drawing register (Documents), or Add a plan to type one. Each shows its name, number, revision and date.
- Floor areas: ground floor, first floor, garage, alfresco and porch to start with. Rename them, add more or remove them. The total is added up for you.
- Design details: ceiling heights, wind classification, site classification and roof pitch to start with, for example 2.7 m, N2, M or 22.5°.
Anything left empty is not printed; if all of it is empty, the section is left out. The note under the design details (that a higher wind or site classification or a change to the plans is a variation) can be changed by clicking it.
Terms and conditions
Section titled “Terms and conditions”The Terms and conditions section starts with clauses most builders use: how long the price holds and the date it runs out, that the document must not be altered, that the price is subject to final drawings and approvals, how variations are charged, site conditions and services, damage to the existing driveway and footpath, workmanship tolerances, and that the tender is not the building contract.
Set your margin on variations and fee per variation on that page; the clause uses them. Click the clauses in the document to change them, one clause per line; they are numbered for you. Check them against your building contract. Copy wording from… brings your clauses to the next job.
The price
Section titled “The price”The tender price is the estimate’s price including GST: the same figure as the Projects page and the BOQ totals bar. Not Required cost codes are left out, and switched-off items count nothing.
If you typed a contract price on the estimate, you can show that instead. Every stage is then scaled by the same amount, so they still add up.
Untick Show the price without GST and the GST to show only the price including GST.
Priced upgrades. To list an upgrade with its own price, such as a plan change or a bigger window, point at its line in the scope of work and click the $. The line shows its price, and the price section shows the base price, each upgrade and the total; the base price is the total less the upgrades, so it always adds up. Name the base price on the left (say “Standard plan Vienna Design”), and untick Show the price by stage too to show only the breakdown.
Numbering. Tick Number every line under Whole document to number the scope of work, specification, inclusions, exclusions and notes by section (2.1, 4.13 and so on), so the building contract can refer to a line.
PS and PC allowances
Section titled “PS and PC allowances”The allowances are the items marked PS or PC in the bill (the Provision column). Choose how to show them:
- At cost inc GST, with your margin on changes. The usual way: the client sees what the allowance buys. The note says that if the actual cost is higher, the difference plus your margin is added. Set the margin under Allowances. It starts at the estimate’s markup.
- At sell price inc GST. The allowance including your markup.
The note above the tables changes to match. You can rewrite it.
Under GST, choose Including GST or Plus GST (for example “$3,000.00 + GST”).
Provisional sums and prime cost allowances are listed in two tables, each with its own total, then the two together. Tick Show only the totals to show one line for each instead of every item. With the totals only, tick Group by cost code to show a total for each cost code under each type, such as Appliances, Plumbing fixtures or Tiles.
A product picture shows beside an allowance when its product has one: the client’s colour selection first, otherwise the product chosen in the estimate.
Pictures
Section titled “Pictures”- Cover picture: pick one of the pictures in the job’s Documents. A file with “render”, “façade”, “elevation” or “perspective” in its name is picked for you.
- Pictures section: tick the plans, renders or photos to show.
- Logo: the logo your company uploaded in the Admin panel (Company settings).
Only pictures (JPG, PNG, GIF, WEBP) appear. To use a PDF plan, save a picture of it first and upload that.
Upload pictures… — under the cover’s picture choices, and under the Pictures section’s — adds new ones without leaving the tender. Drop them on the window or click to choose them; anything that is not a picture is left out with its name shown, and each can be removed before it goes. They are saved into the job’s Documents, in a folder you pick, so they can be used in other tenders too.
A tick, on by default, puts them straight to use: from the cover, Use it as the cover picture; from Pictures, Add them to the Pictures section, which also turns that section on if it was hidden. A picture that fails — too large, say — stays in the list with the reason, so you can try again. You need the Documents module and permission to upload documents.
Copying wording from another job
Section titled “Copying wording from another job”Most builders use the same letter, inclusions and exclusions on every tender. Click Copy wording from… and pick another job’s saved tender. It takes:
- the letter, the stage names, the inclusions, the exclusions, the notes and the terms
- your choices for showing the allowances and the price
This job’s prices, items, client, date and pictures stay as they are. Check the words, then save.
Start again puts everything back to how a new tender starts. Your saved copy is kept until you save.
Printing and PDF
Section titled “Printing and PDF”Click Print or save as PDF. In the print window, choose Save as PDF as the printer to make a file to email. The tender prints on A4 with the cover on its own page, your company and the job at the foot of each page, and page numbers.