
Specification
Available onEstimatorBuilder
The job specification is the written description of what you are providing. In SmarteBuild it is built out of the bill rather than written separately, which is what stops the two drifting apart: if an item is not in the bill, it is not in the specification.
Putting items in the specification
Section titled “Putting items in the specification”Two ways, and you can use both:
- From the BOQ. Tick the items, open Actions on the toolbar and choose Add to Specification. Items already in it stay in it; the message tells you how many were added and how many were there already.
- From the Specification window. Press Add items, type part of a cost code or its name to find it, tick the items you want and press Add. Only items that are not in the specification yet are listed.
The Specification window
Section titled “The Specification window”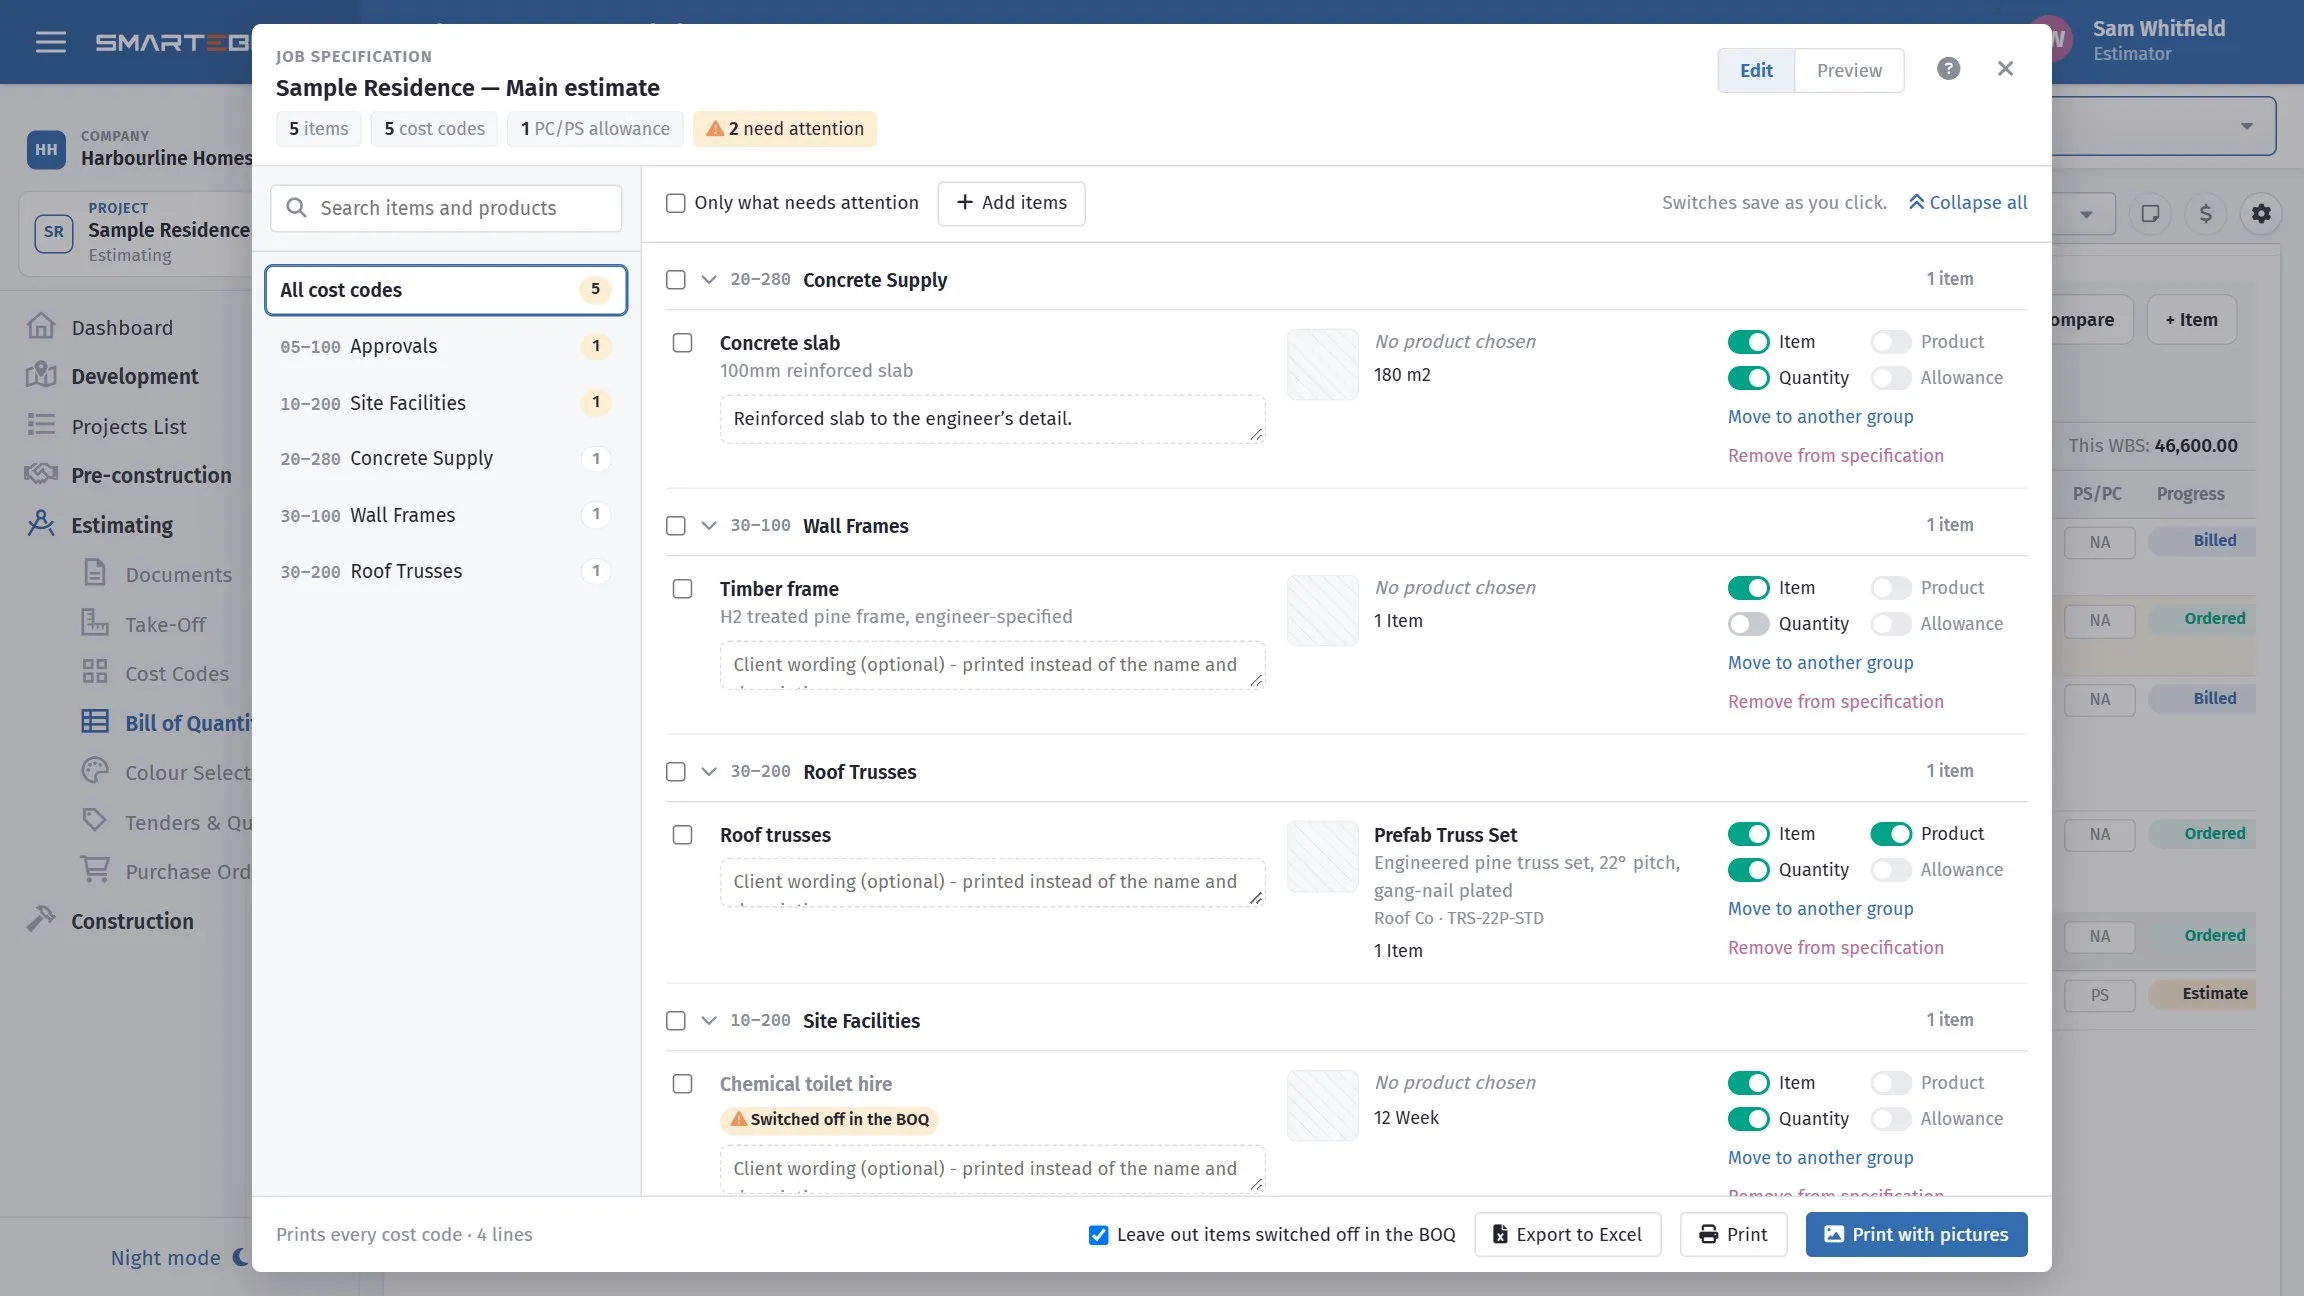
Four switches on each line decide what the client sees: the item, the product, the quantity and the allowance. The chip at the top counts the lines worth a second look — here an item switched off in the estimate, and a PS allowance that is not being shown.
Open it with Specification on the BOQ’s Reports tab.
- Down the left: the cost codes that have items in the specification, with a count. A yellow count means something in that cost code needs attention. All cost codes shows everything. The search box finds items by name, description, wording or product.
- On the right: one section per cost code. Each line shows the item, its product (with a picture when there is one) and its quantity. Click a section’s heading to fold it shut or open it again; Collapse all / Expand all does every section. A folded section still shows how many items it holds and how many need attention. While you search, every section with a match opens.
- Along the top: totals, and how many lines need attention. Click that to see only those.
What prints on each line
Section titled “What prints on each line”Every line has four switches. They save as soon as you click them.
| Switch | Prints |
|---|---|
| Item | The item’s name and description, or your client wording (below) |
| Product | The chosen product, its description and maker |
| Quantity | The quantity and unit |
| Allowance | For PC and PS items: the allowance, with its amount |
To change many lines at once, tick them (or tick a cost code’s heading to take the whole section) and use the bar that appears: quantity on or off, product on or off, item on or off, or remove.
Remove from specification takes the item out of the specification only. It stays in the BOQ, priced as before.
Client wording
Section titled “Client wording”The item description is written for your subcontractor. The client needs different words. Type them in the box under the item, and that is what prints instead of the name and description. It saves when you click away. Leave it empty to print the item as it is.
| Item description (to trade) | Client wording |
|---|---|
N32 concrete, 80mm slump, supply and place |
Concrete slab to engineer's design |
SL72 mesh, 40mm cover, 300mm laps |
Steel reinforcement to engineer's design |
200µm vapour barrier, taped laps, sealed to edge |
Damp-proof membrane under slab |
Needs attention
Section titled “Needs attention”A line is flagged when the client would see something odd:
- Switched off in the BOQ: you are no longer providing it, but it is still in the specification.
- PC or PS allowance not shown: the client is not told it is an allowance, which is where most variation disputes start.
- No product chosen: Product is switched on but the item has no product.
- Nothing switched on to print: every switch is off, so the line prints nothing.
Tick Only what needs attention to work through just those lines.
Renaming a group. The specification is grouped by cost code. To give a group a clearer name for the client (say “Tapware and sanitaryware” instead of “Plumbing Fixtures (PC items)”), point at its heading and click the pen. Type the new name and press Enter, or Esc to cancel. The new name is used in this window, on the printed specification and in the client tender, for this estimate only. Your cost code keeps its name. Clear the name to go back to the cost code’s.
Moving an item to another group. Click Move to another group under an item, or tick several and click Move to…. Type to find the group you want; groups already in the specification are listed first. The item is shown in that group in this window, on the printed specification and in the client tender, and is tagged with the cost code it came from. In the BOQ it stays under its own cost code, so budgets and orders are not affected. To undo, move it again and choose Back to its own cost code.
PS and PC items
Section titled “PS and PC items”Items flagged PS/PC carry an allowance for something not chosen yet. Switch Allowance on for them, and the printed line says Prime cost (PC) allowance or Provisional sum (PS) with the amount. The printed specification adds a note that differences from the allowance are adjusted by variation.
Good client wording helps here too:
Tapware: prime cost allowance of $1,200, supply only. Client to select.
A client who has read that is not surprised when the tapware they choose costs $1,900 and a variation follows.
Preview, print and export
Section titled “Preview, print and export”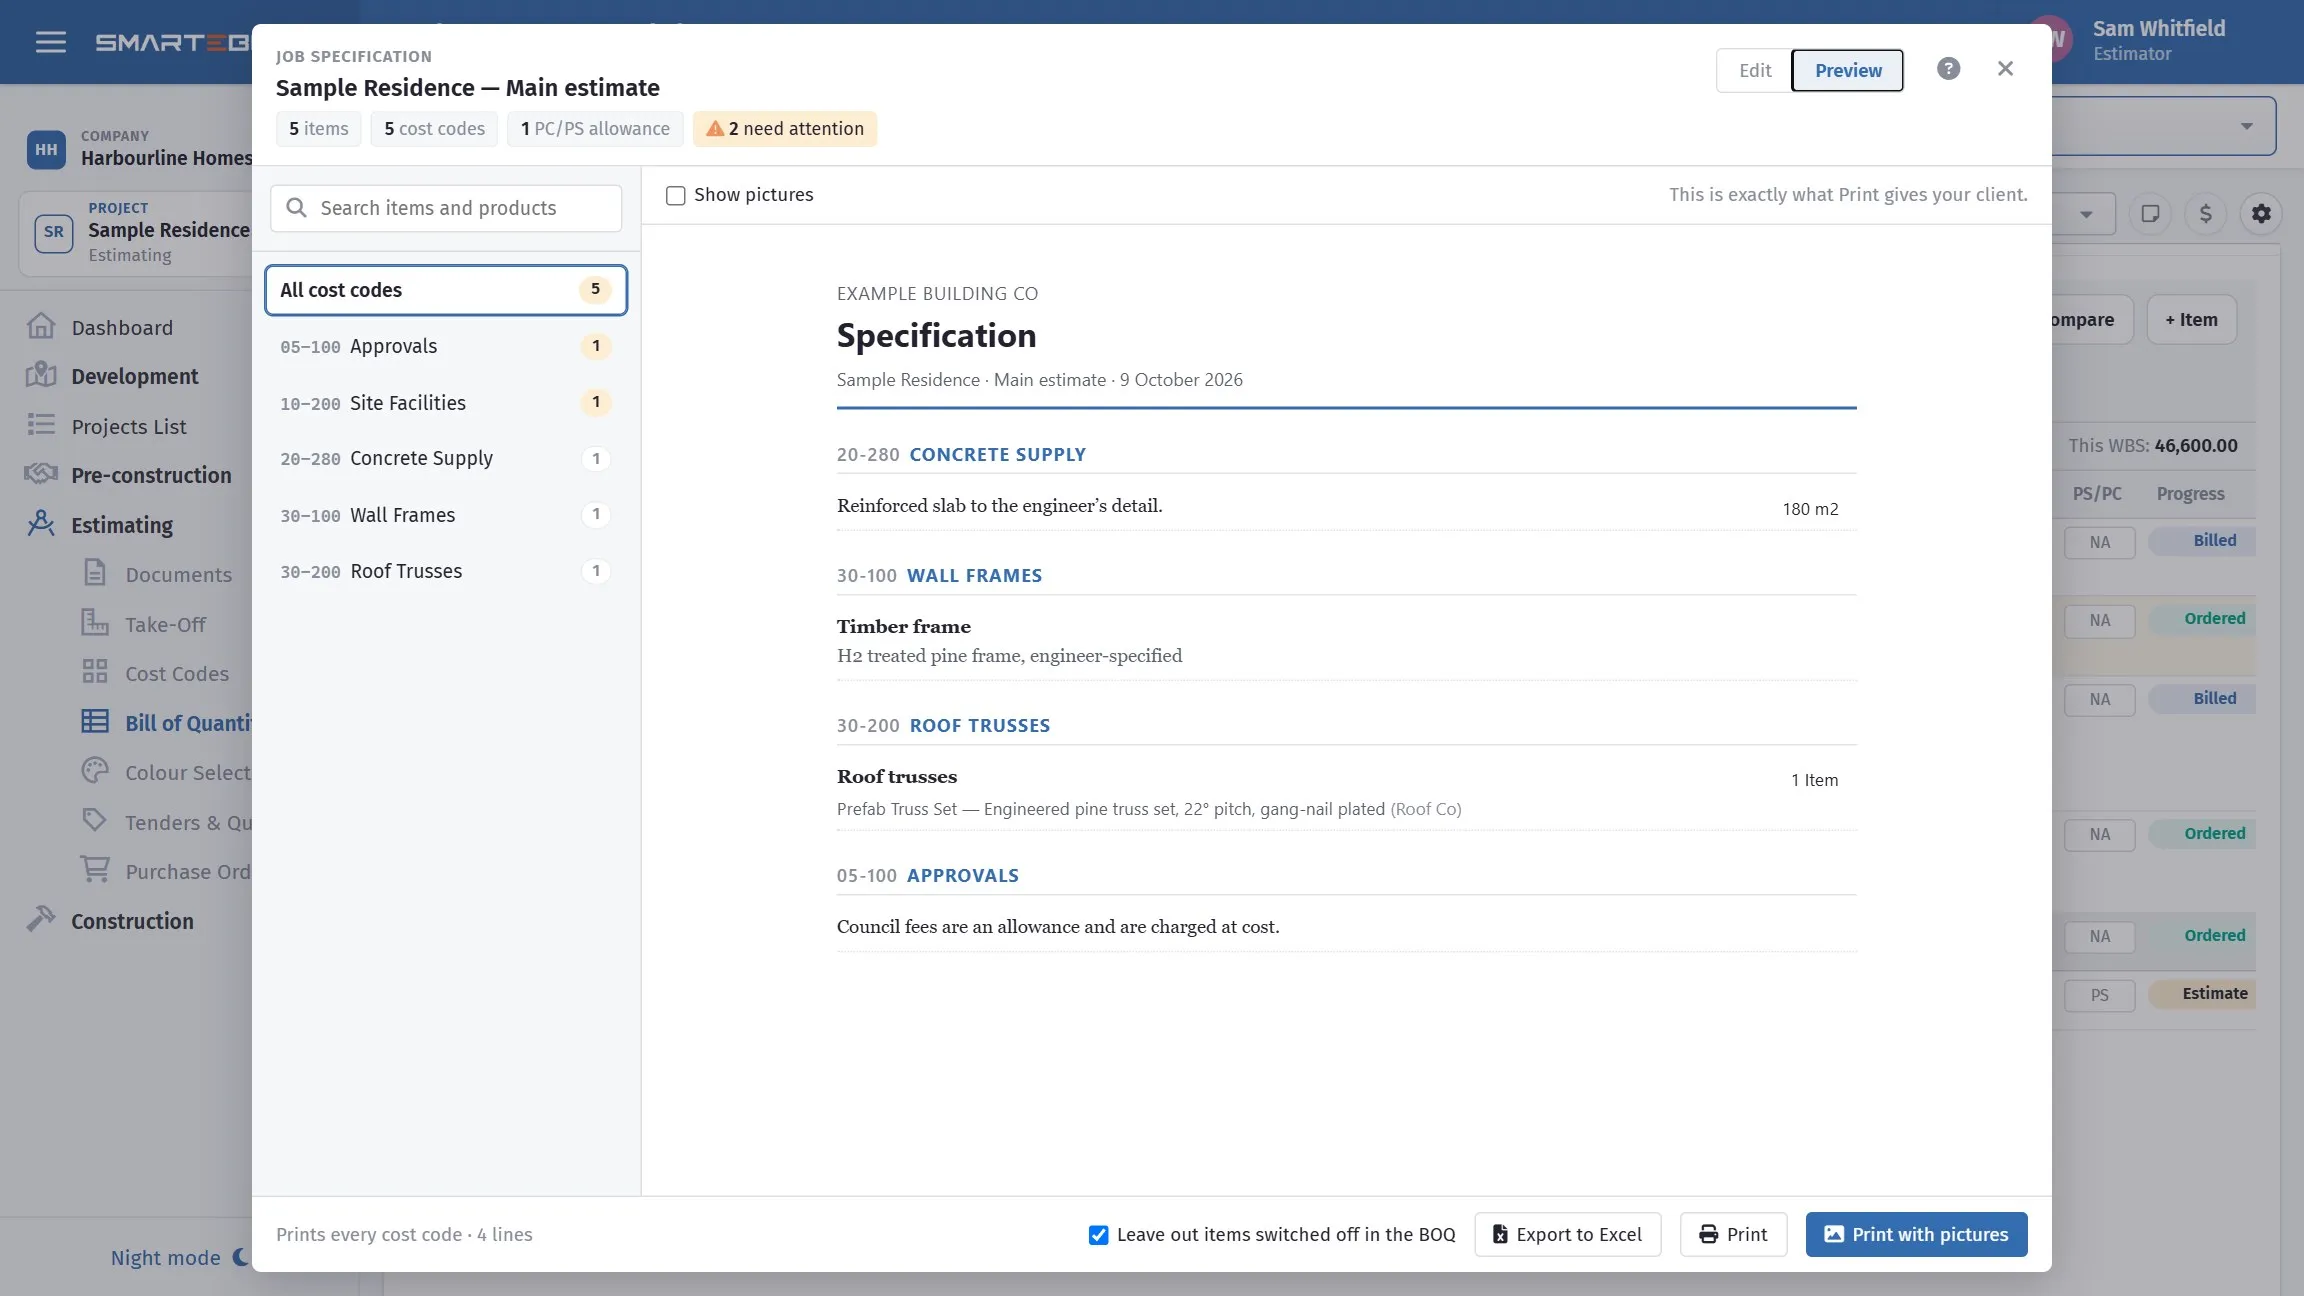
The same five items, printed as four. The toilet hire has dropped out because it is switched off, and the slab prints its client wording — “Reinforced slab to the engineer’s detail.” — instead of the item name and description, which is what that box is for.
- Preview (top right) shows the specification exactly as it prints. Tick Show pictures to see it with product pictures.
- Print and Print with pictures open the specification in a new tab and bring up your browser’s print window. Choose Save as PDF there to attach it to a quote or contract.
- Export to Excel downloads the same lines as a spreadsheet.
All three follow what is on screen: pick one cost code on the left to print just that cost code, or All cost codes for the whole job. Leave out items switched off in the BOQ is ticked to start with; the window remembers your choice.
If nothing happens when you press Print, your browser blocked the new tab. Allow pop-ups for SmarteBuild and press it again.