
3D models (IFC)
Available onEstimatorBuilder
Most drawings arrive as PDFs, and you measure them. Some designers can also give you the model the drawings were made from. Ask for it as an IFC file: Revit, ArchiCAD and most other design programs can export one. A model already knows how many doors there are and how big each wall is, so instead of measuring you read the figures off it.
Your first model in five steps
Section titled “Your first model in five steps”- Ask the designer for the model as an IFC file (see below).
- In Take-Off choose Open PDF, then Upload, and pick the
.ifcfile. - Click a type in the list on the left, for example the external brick wall. It lights up in the 3D view and its figures appear in a panel.
- Press Send to field beside the figure you want, and choose or name the field.
- Price the field in the BOQ as you would any measured field.
Watch: From model to field (36 seconds, no sound)
Asking the designer for the model
Section titled “Asking the designer for the model”Most design programs export IFC from their File menu: in Revit it is File › Export › IFC, in ArchiCAD it is File › Save As with the type set to IFC. Three things to ask for:
- IFC4 or IFC2x3. Either works.
- Rooms (spaces) included, if you want floor areas and room perimeters.
- The same file updated, not a fresh model, when the design changes. That keeps each element’s id, which is what lets SmarteBuild show you exactly what was added, changed and removed.
The file’s own quantities are optional. SmarteBuild works the figures out from the shapes.
Opening a model
Section titled “Opening a model”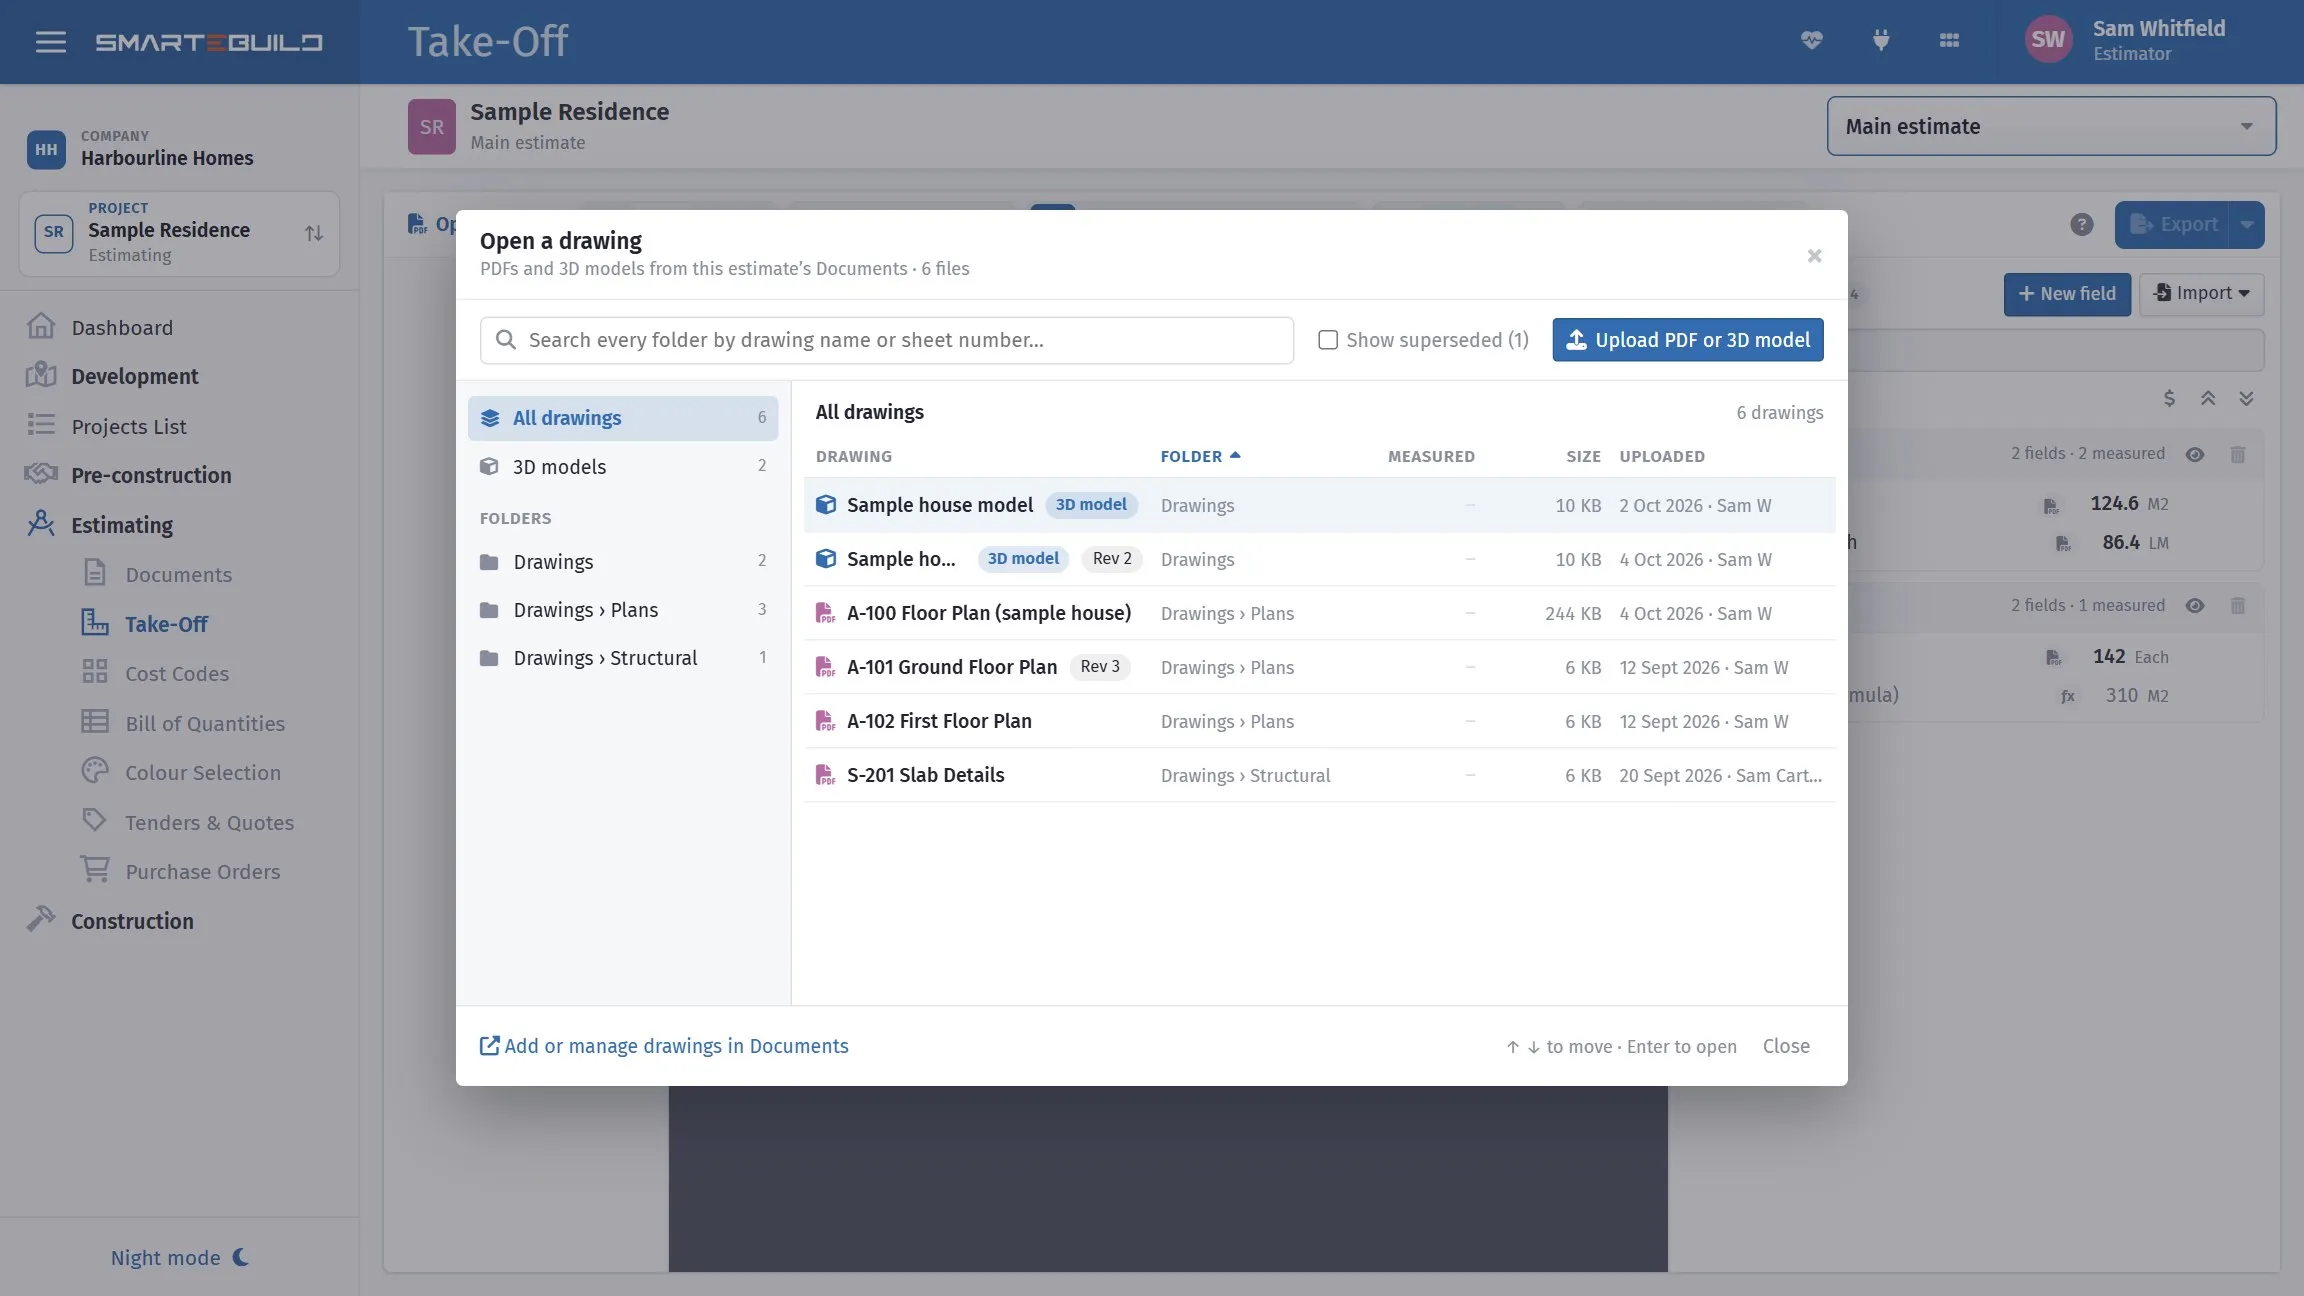
Models sit beside the drawings. The filter narrows the list to the 3D ones.
A model opens from the same place as a drawing. Choose Open drawing (or Change), and the
picker lists models beside PDFs, with a 3D model tag. 3D models on the left lists only
the models; with none in the estimate yet, it explains what to ask the designer for and offers
the upload. Upload PDF or 3D model takes an .ifc file as well as a PDF; it is filed in
this estimate’s Documents.
When a model is open the middle of the window is a 3D view and the left rail is a model browser. The fields panel on the right is the same one you use for PDFs.
- Drag turns the model, right-drag slides it, the wheel zooms.
- Fit brings everything shown back into view.
- With more than one storey, the storey list shows one floor at a time. The figures in the list follow it.
- Hide roof lifts the roof and the ceilings off so you can look inside. With a storey chosen as well, you are looking down into one floor.
- Hide site is on to begin with. A designer’s model usually carries trees, furniture and the block of land; they are hidden in the view and left out of the list. Press it to bring them back. Fixtures you would count, such as toilets, basins and taps, stay listed under Fixtures.
Names are shortened where the design program repeats itself: Revit’s “Basic Wall:Stud Wall - 90mm” is listed as “Stud Wall - 90mm”. Hover over a name to see it in full.
Types and rooms
Section titled “Types and rooms”Types lists every kind of element in the model, grouped as walls, slabs, roofs, doors, windows and so on, with how many there are and their main quantities.
Rooms lists the rooms the designer modelled, each with its floor area and the distance round its walls.
Click a type and its elements turn blue in the view. Click an element in the view and its type is selected in the list. Only this type hides everything else.
The figures
Section titled “The figures”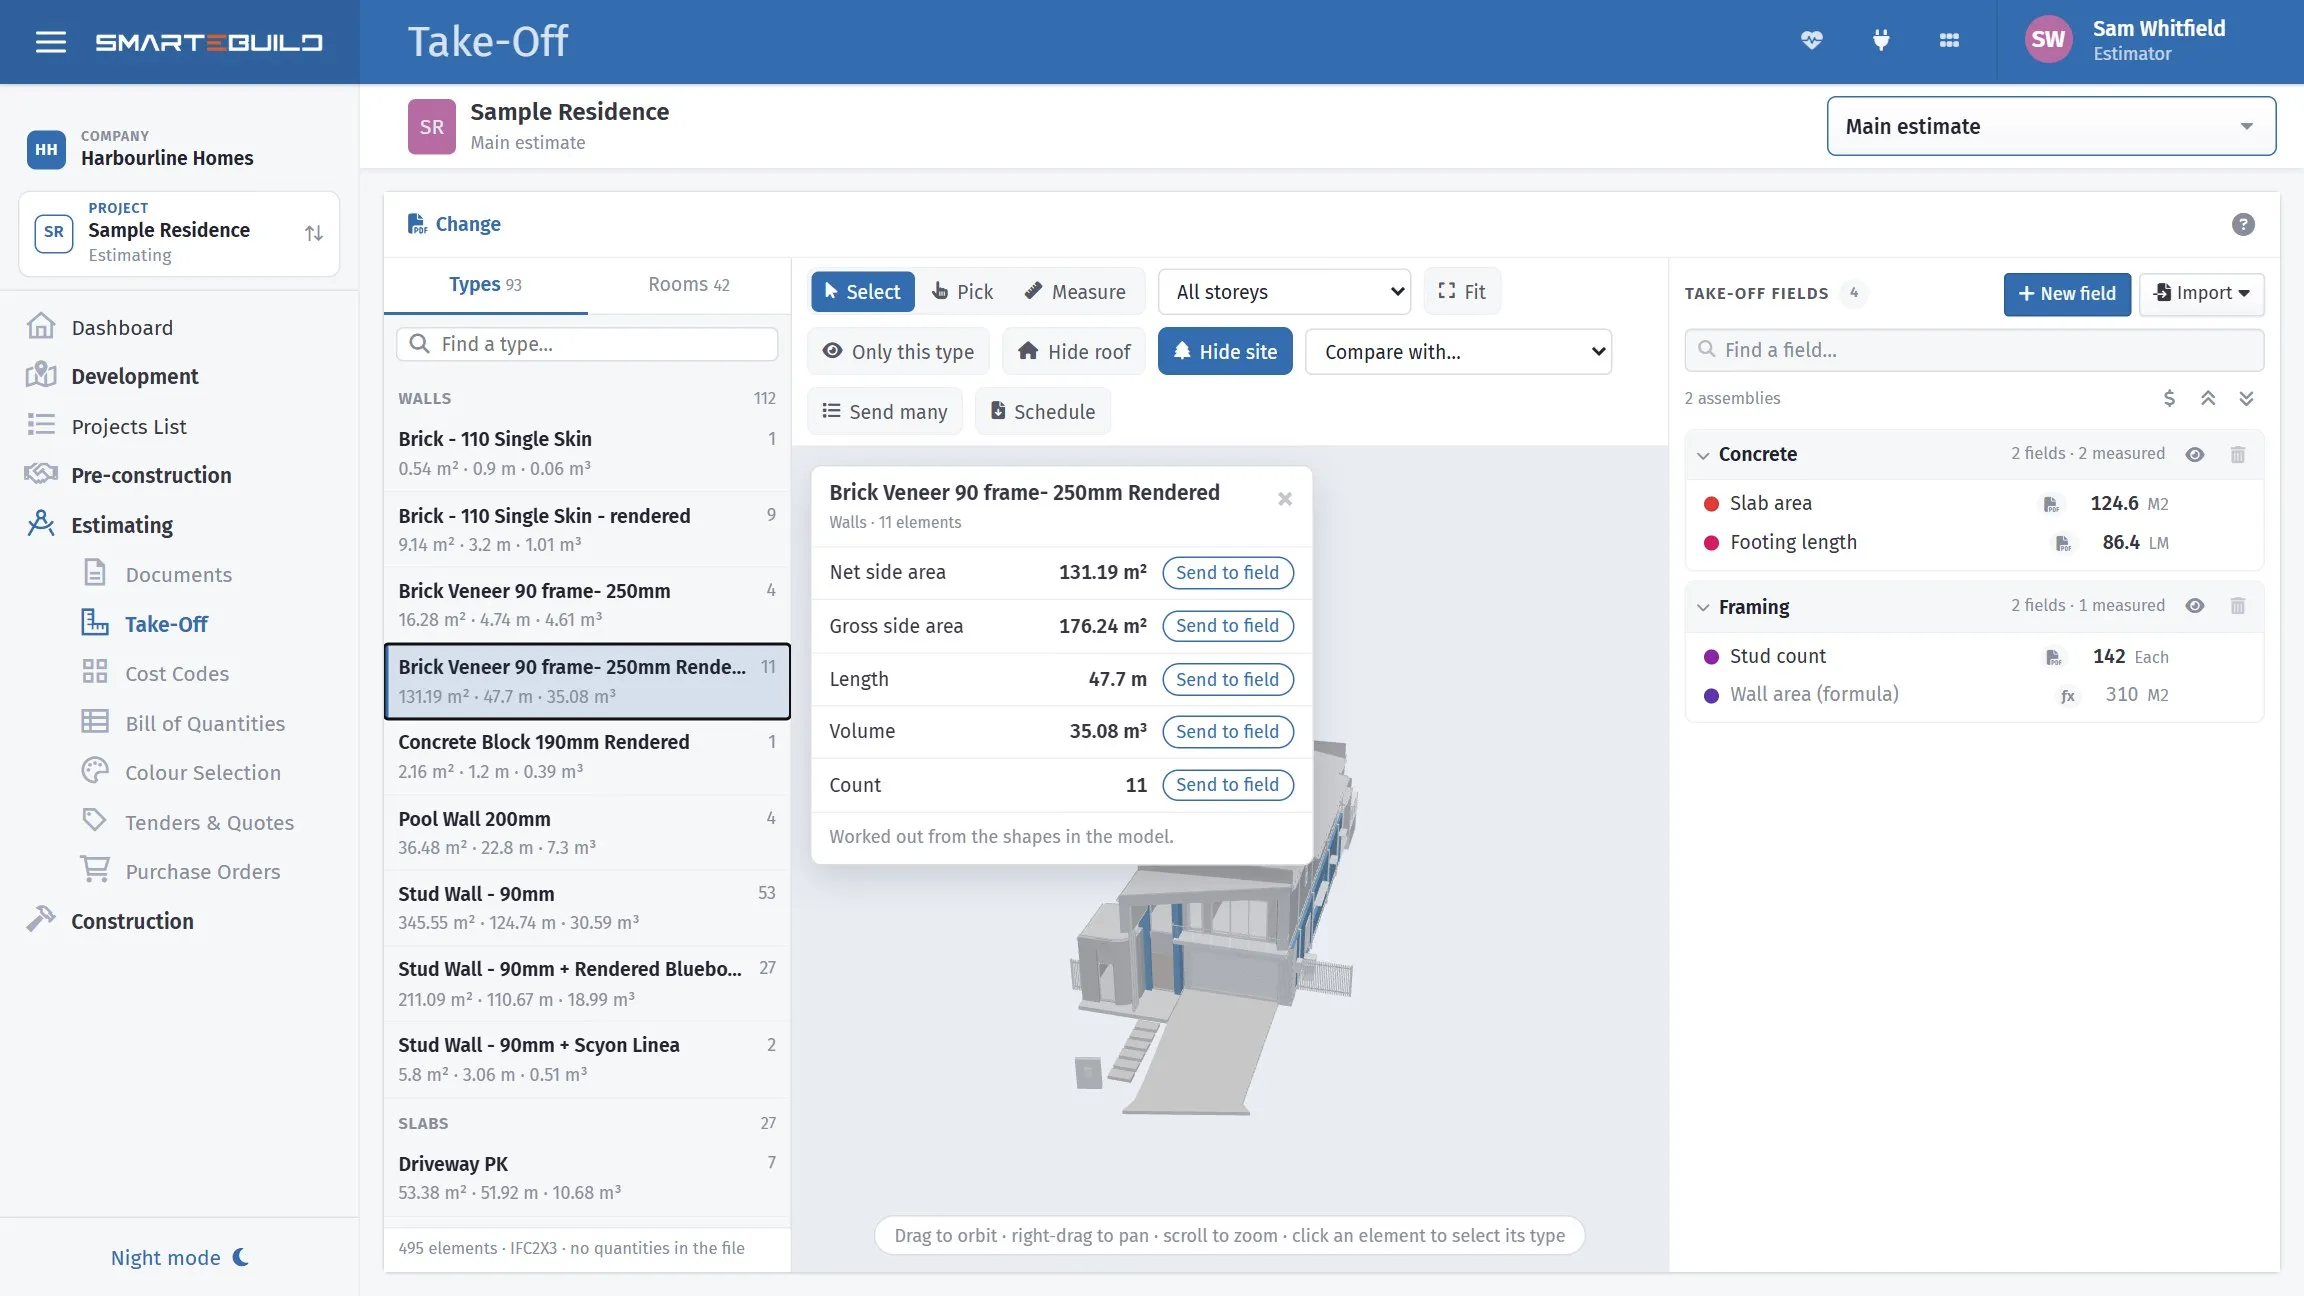
Click an element and its type is selected: every figure the model holds for it, and a warning where the file’s own number disagrees.
For the selected type or room a panel shows what it can give you:
| What you get | |
|---|---|
| Walls | Net side area (openings taken out), gross side area, length, volume, count |
| Slabs, roofs, coverings | Area, perimeter, volume, count. A pitched roof gives the area on the slope and the area seen from above |
| Beams, columns, framing | Length, volume, count |
| Doors and windows | Count, and area from width x height |
| Rooms | Floor area, perimeter, wall area (perimeter x height), volume. Where doors or windows stand in the room’s walls: skirting (perimeter less the door widths) and wall area less doors and windows |
SmarteBuild works these out from the shapes in the model. Many files carry no quantities of their own, and some design programs write a wall’s area before the door and window openings are taken out. Where the file’s own figure disagrees with ours, a warning shows both, and you choose which to send.
Sending a figure to a field
Section titled “Sending a figure to a field”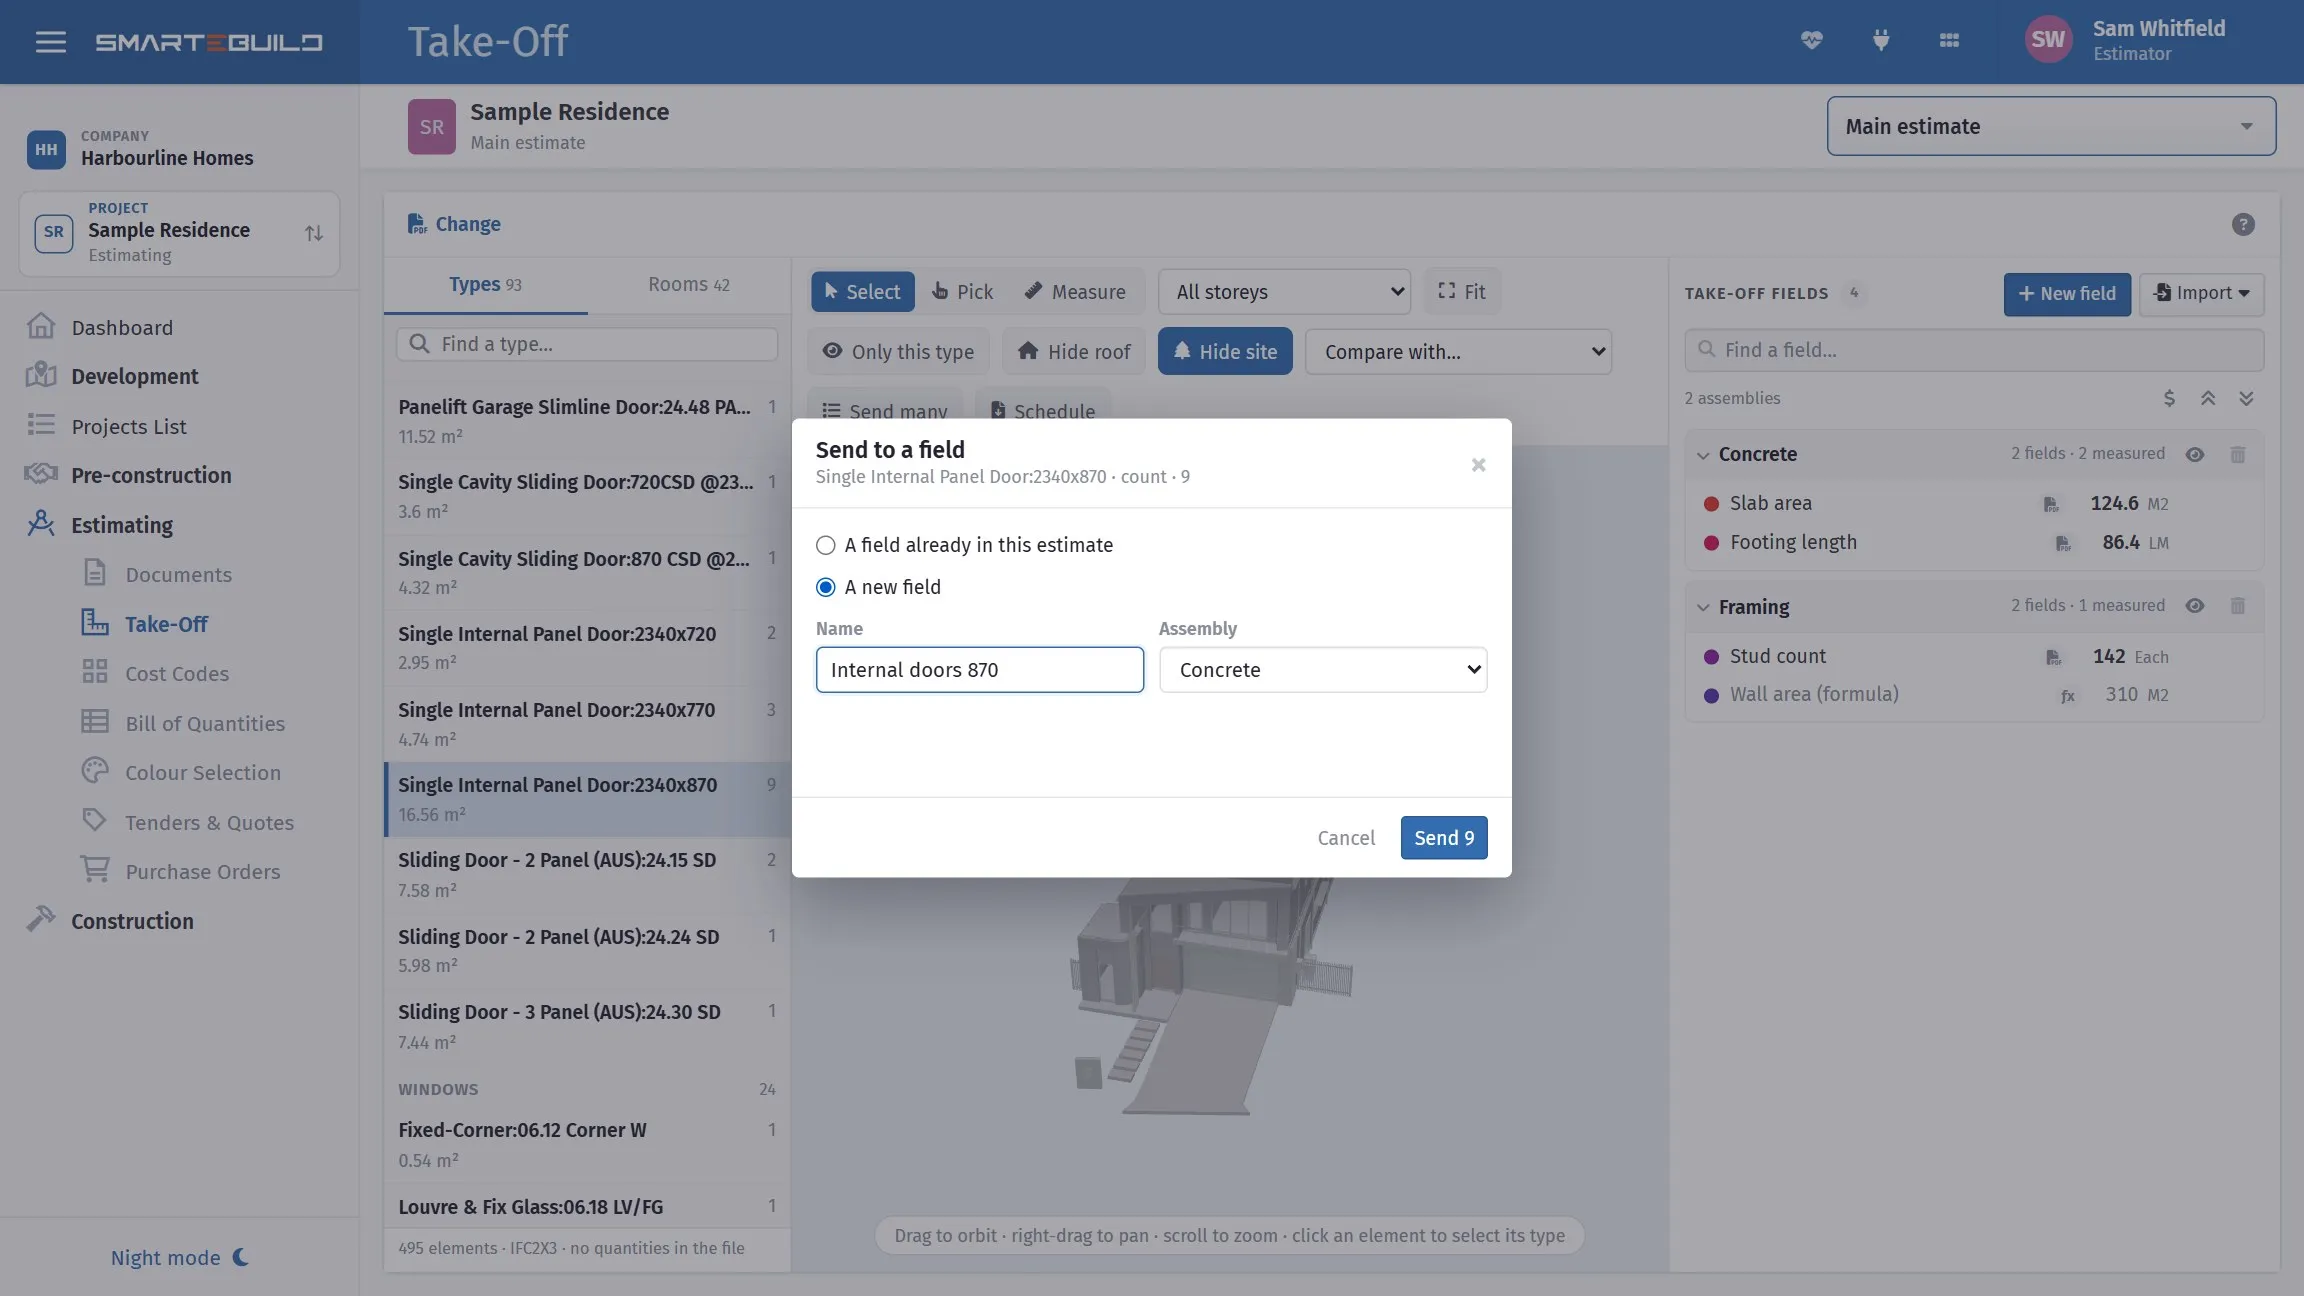
The figure lands in the field and the field remembers where it came from.
Press Send to field beside a figure, then choose a field already in the estimate or name a new one. The quantity lands in the field with a note of where it came from, and every BOQ item priced off that field follows it.
- Only fields in the matching unit are offered: an area goes to an M2 field, a length to LM, a count to Each.
- A field you have already measured on a PDF keeps its drawn quantity. It is listed but cannot be chosen, so one number never silently overwrites another.
- The pairing is remembered. Next time a model has the same type, the panel shows which field it fed last time.
- A green dot in the list marks a type or room that already feeds a field.
SmarteBuild keeps a note of what filled each field: which model, which type or room, and which figure. That note is what lets a revised model bring the fields up to date for you.
Sending many figures at once
Section titled “Sending many figures at once”A real model has a hundred types, and one at a time is slow. Send many on the bar above the view lists every type as a row:
- Figure: which of the type’s figures to send. Walls start on net side area, slabs on area, doors and windows on count.
- Goes to field: start typing and choose a field of this estimate, or type a new name to make a new field. Leave it empty and that type is not sent.
Rows are filled in for you where SmarteBuild already knows the answer: a type that already fills a field in this estimate, or one you paired with a field of the same name on an earlier job. Fill empty rows with new fields names a new field after each remaining type, and you choose the assembly the new fields go into. A row that cannot be sent says why: the field is in a different unit, it is measured on a plan, or two rows point at the same field. Nothing is sent until you press Send.
One wall, or the five you choose
Section titled “One wall, or the five you choose”Pick on the bar lets you click elements one by one. The panel shows the figures for exactly those: one wall’s own area, or a running total as you add more. Click an element again to drop it. You can send that total to a field like any other figure.
A hand-picked figure is not tied to a type, so a revised model cannot update it for you. Use it for the odd one out, and whole types for everything else.
Door and window schedule
Section titled “Door and window schedule”Schedule downloads the doors and windows as a file that opens in Excel: each type with its width, height, storey and count, and the totals. With a storey chosen it lists that floor only.
When a revised model arrives
Section titled “When a revised model arrives”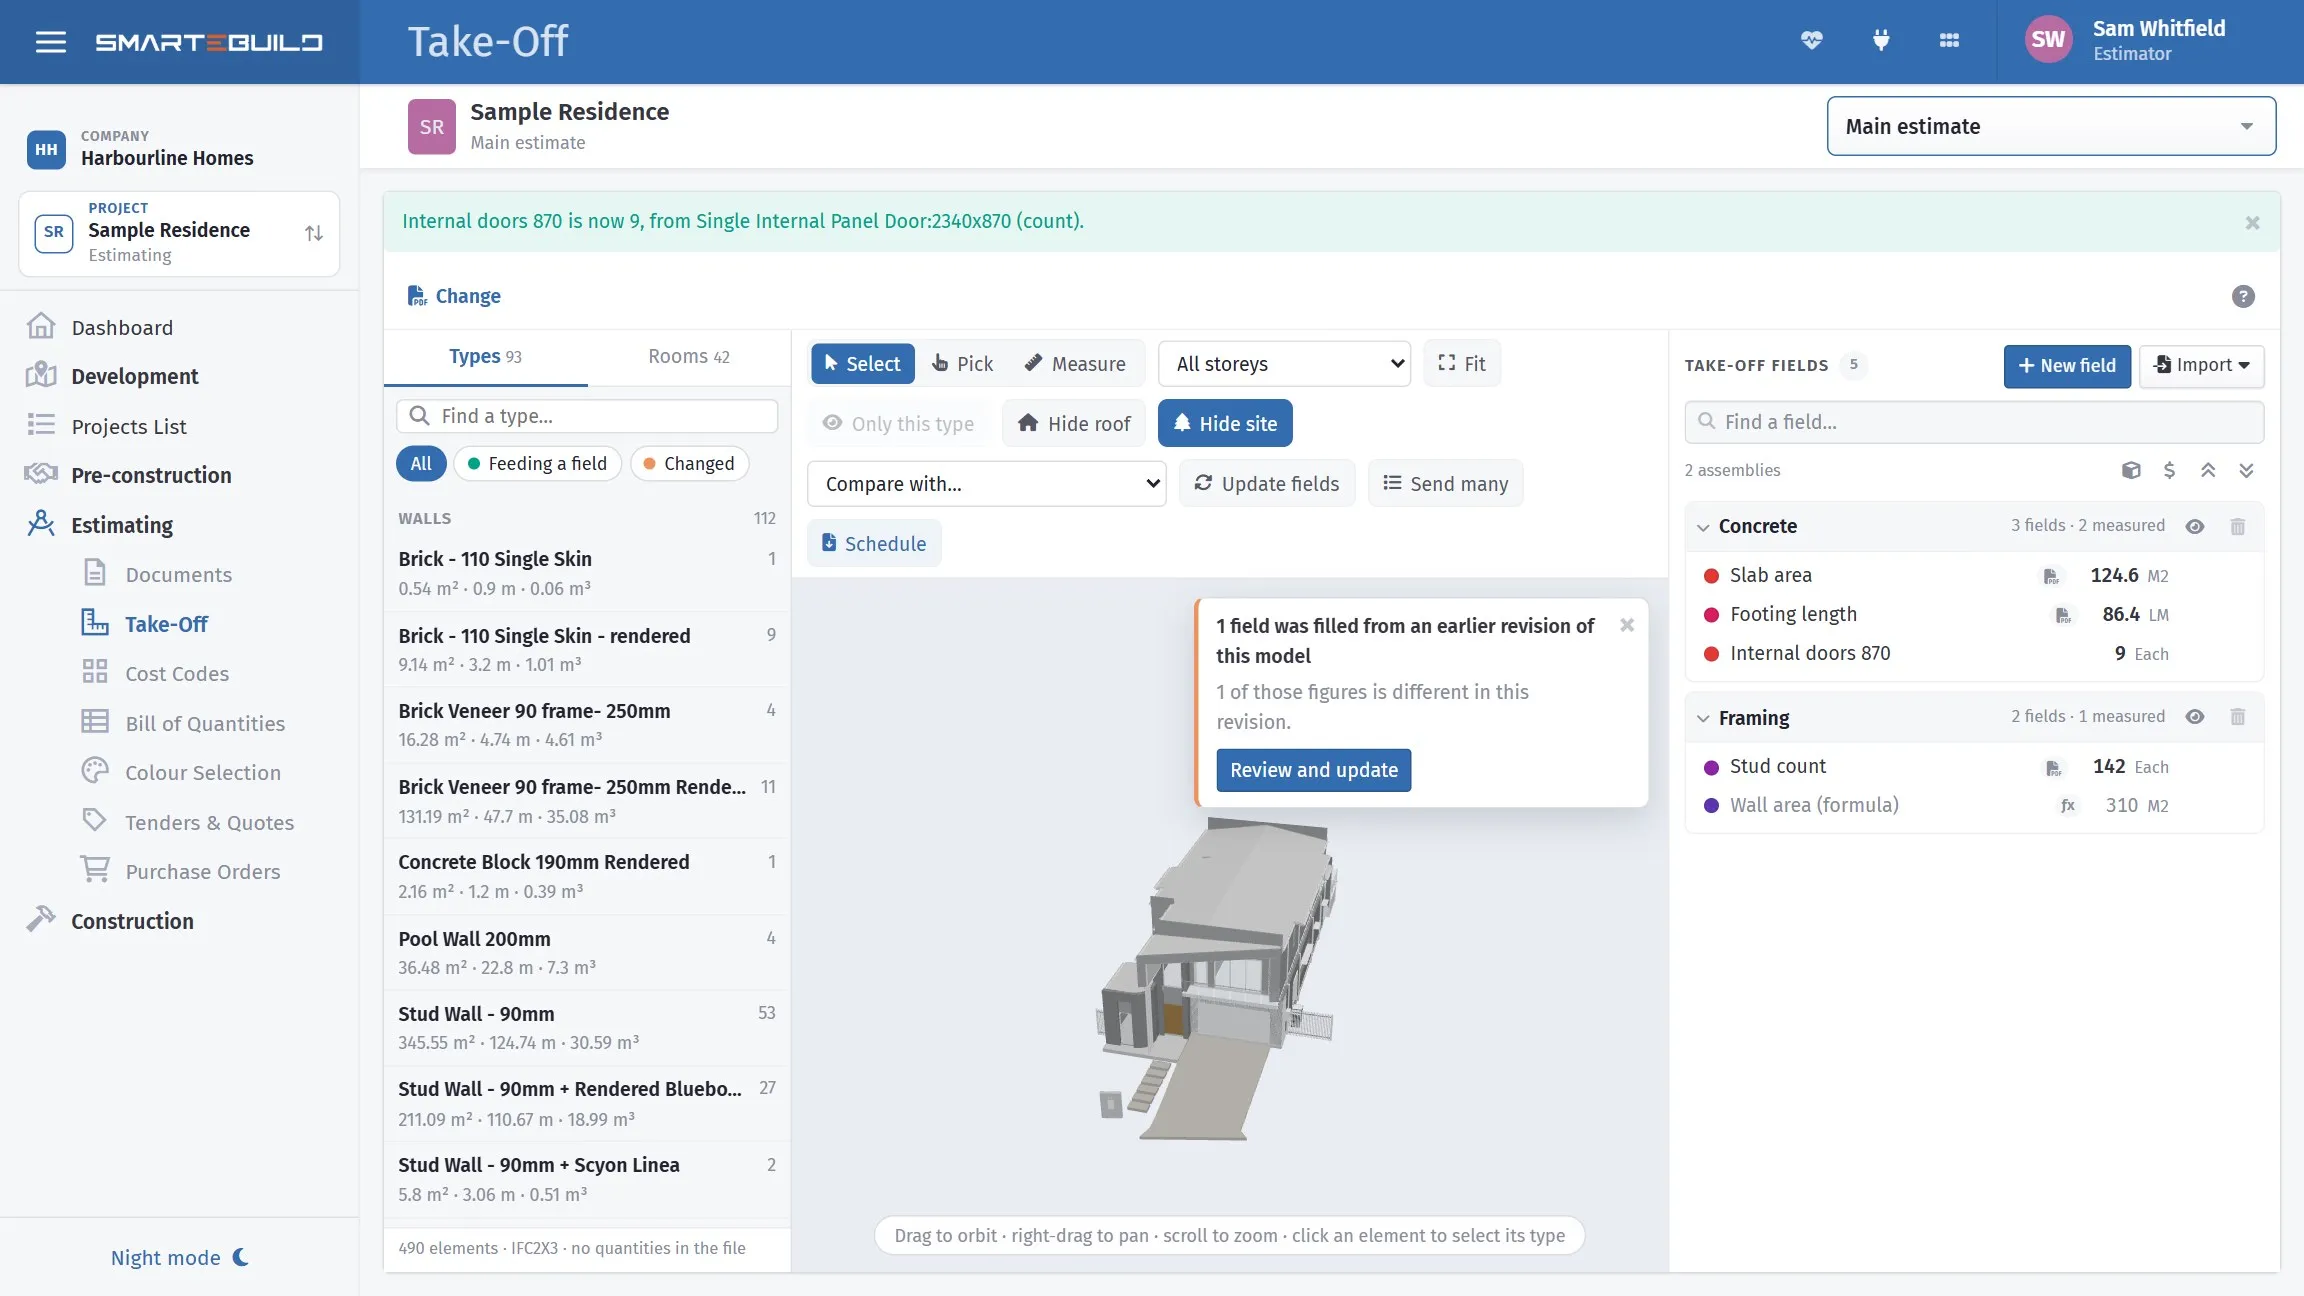
Nothing changes by itself. The notice tells you how many fields the earlier revision filled, and how many of those figures have moved.
Designs change. When the designer sends a newer model, add it in Documents as a new version of the old one, then open it in Take-Off.
A notice over the view tells you how many fields were filled from the earlier revision and how many of those figures are different now. Press Review and update (or Update fields on the bar above the view) to see them:
| Column | What it shows |
|---|---|
| Field | The take-off field and its assembly |
| Filled from | The type or room and the figure that was sent, and which model it came from |
| Was | What the earlier model gave |
| Now | The same figure in the model you have open |
| Change | The difference, up or down |
The changed rows are ticked for you. Press Update and those fields take the new figures; every BOQ item priced off them follows. Nothing is overwritten quietly:
- A figure that did not change is left as it is, and noted as checked against the new model.
- A quantity someone has typed over by hand since is flagged and left unticked. Tick it only if you want the model’s figure back.
- A type or room that is no longer in the model keeps its quantity, and the row says so. If the designer only renamed it, choose what it is now from the list under the row: the closest names in this model are offered, most alike first. The row then shows the new figure and is ticked like any other change. Nothing is matched by guesswork without you choosing.
- A field that has since been measured on a PDF is listed but cannot be updated. The drawing sets its quantity.
If the newer model was uploaded as a separate file rather than a new version, Update fields still works: tick Also list fields filled from other models in this estimate.
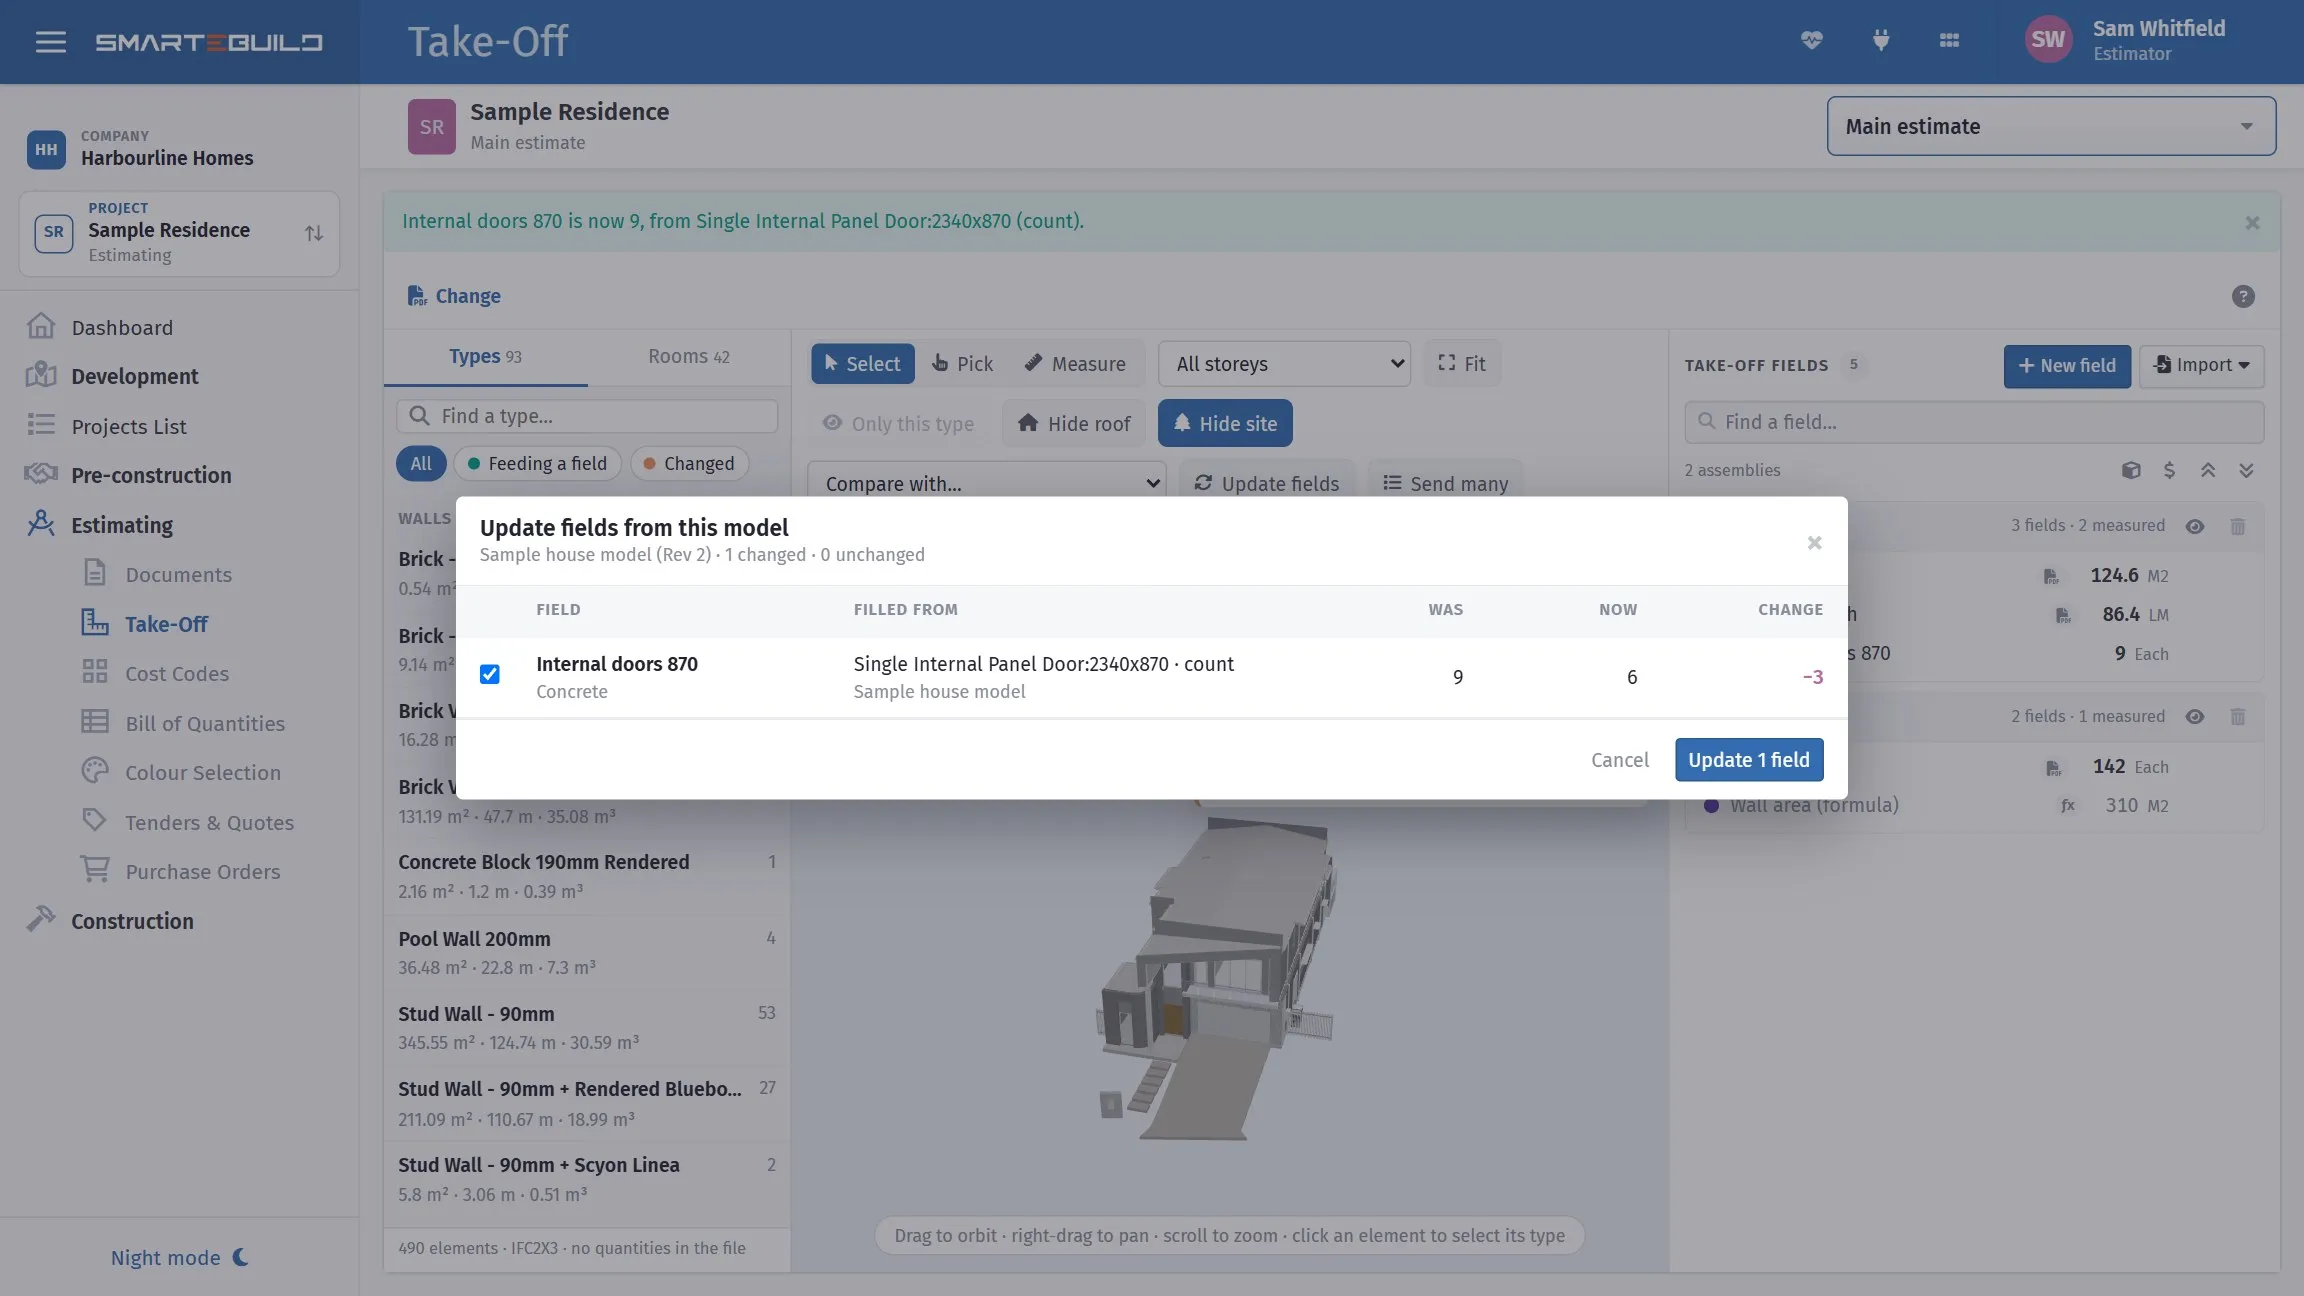
Was, Now and the change for every field — untick anything you do not want, then update the rest.
Finding what a model filled
Section titled “Finding what a model filled”- In the fields panel, the cube button beside the price switch lists only the fields a model filled.
- In the Types list, Feeding a field lists only the types a field takes a figure from, and Changed lists the types that are not what they were. An orange dot marks a changed type.
Watch: The design changed (28 seconds, no sound)
Comparing two revisions
Section titled “Comparing two revisions”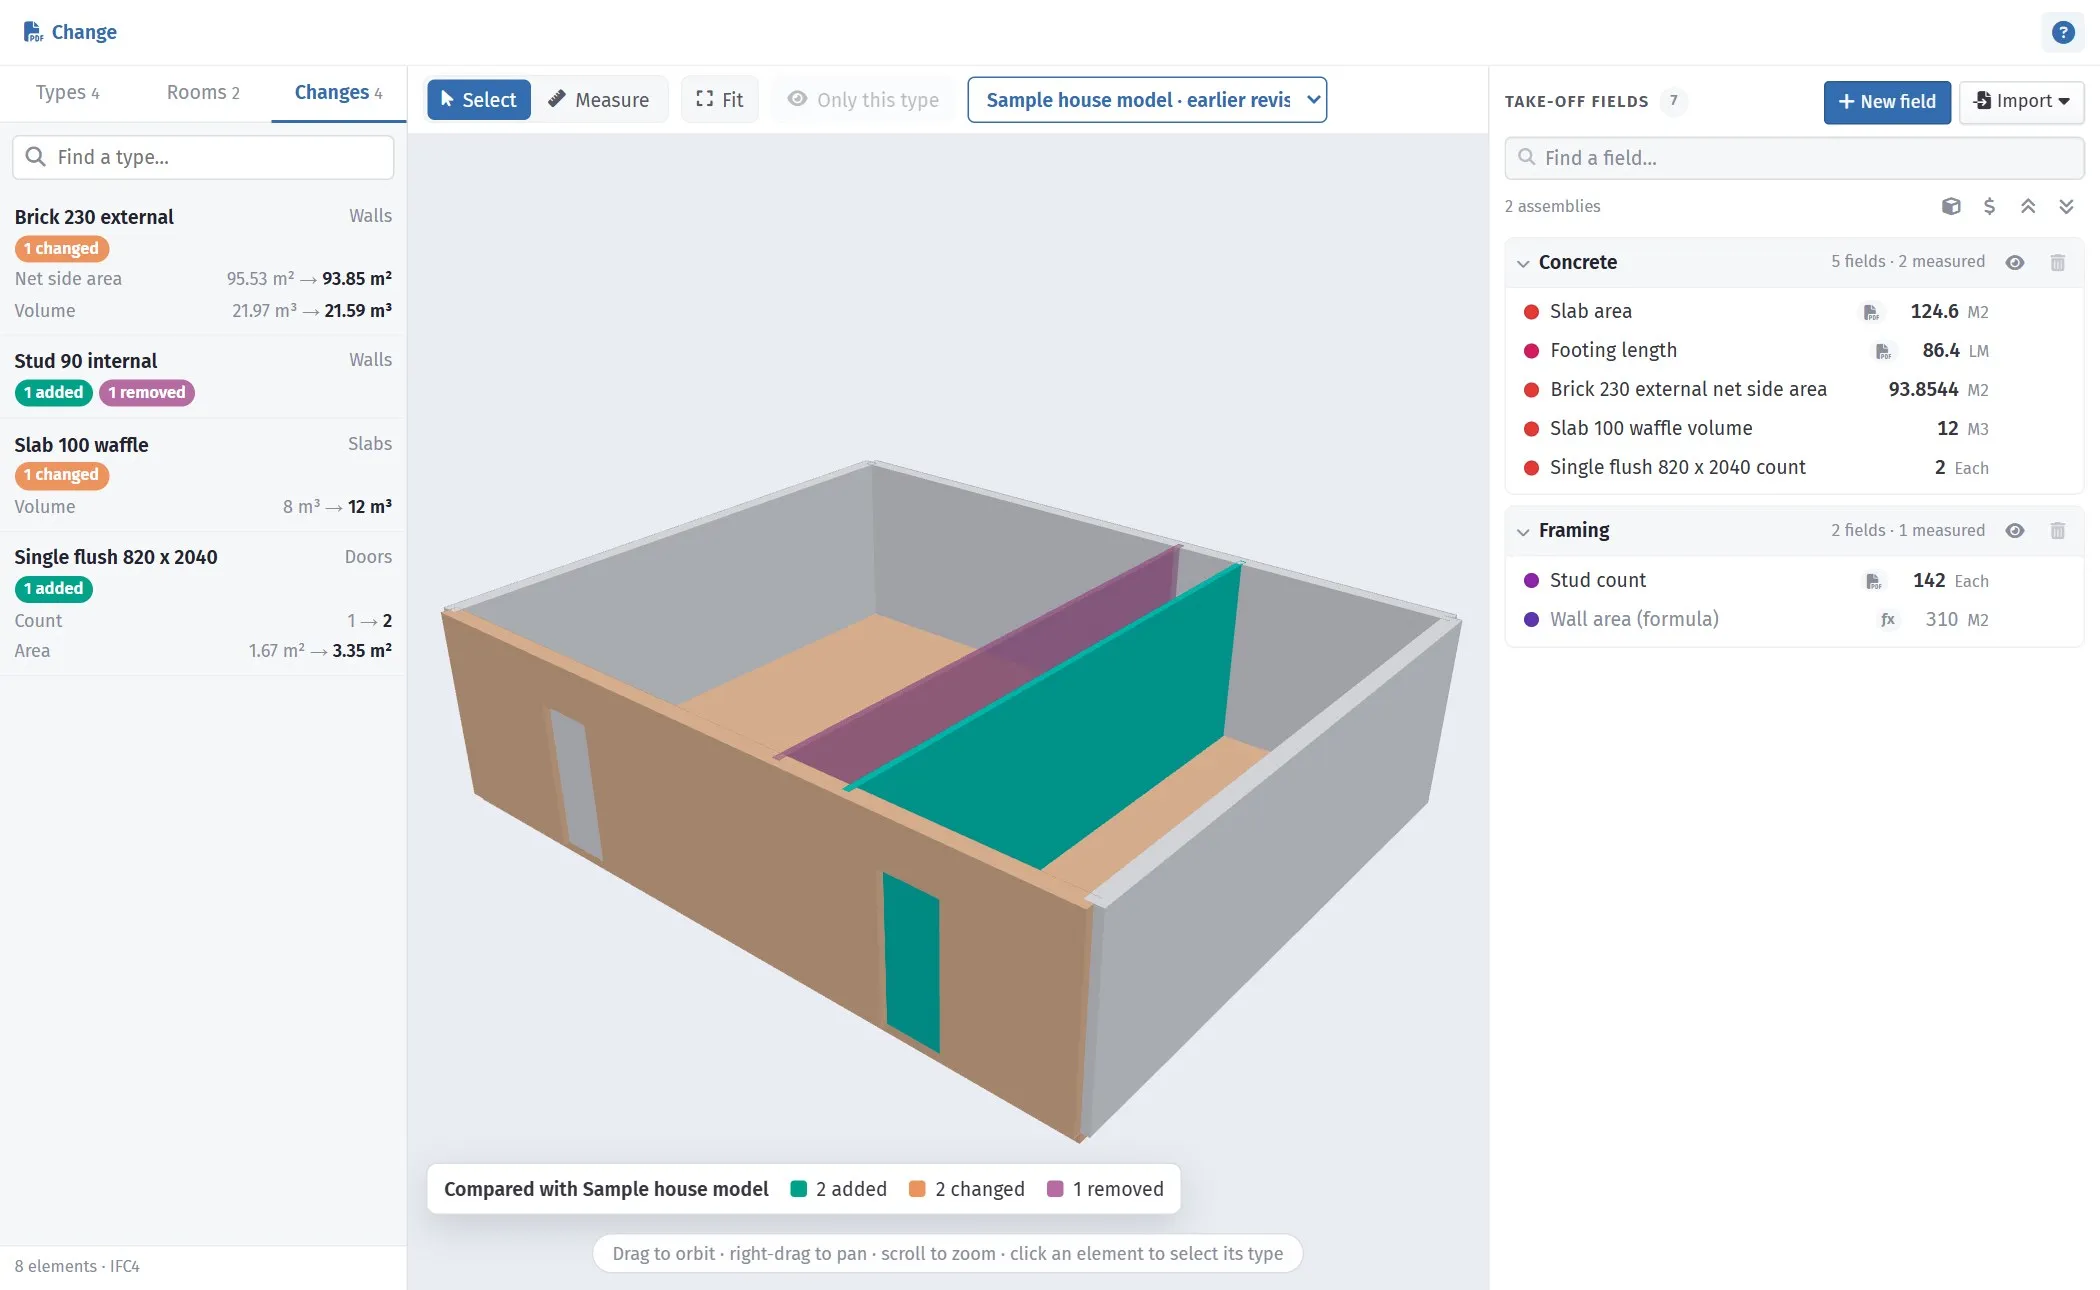
Teal is added, orange is changed, pink is gone — in the model and in the Changes list.
Compare with on the bar above the view puts another model of the estimate beside the one you have open. The view colours what is different:
- Teal: added in this model.
- Orange: changed. It moved, or its size or type is different.
- Pink: removed. It is drawn faintly where it stood in the earlier model.
A Changes tab lists the affected types with how many elements were added, changed and removed, and each total as it was and as it is now. Click a row to bring those elements into view. Choose Stop comparing to go back to the plain model.
Elements are matched by the permanent id the design program gives each one. Some programs give every element a new id on export. Then everything shows as added or removed, and a warning says so. The totals for each type are still right.
Watch: What changed (32 seconds, no sound)
The videos use a real architect’s model. Its two “revisions” were made for the demonstration by leaving a few walls, doors and a window out of each.
Checking a dimension
Section titled “Checking a dimension”Measure lets you click two points on the model and read the distance between them. Nothing is saved; it is a check, like the Ruler on a PDF.
Good to know
Section titled “Good to know”- The model is read in your browser each time you open it. A house takes a few seconds; a very large commercial model can be slow.
- The figures are only as good as the model. If the designer did not model skirting, there is no skirting to read. Fixings, wastage and labour still come from your assemblies.
- If the Rooms list is empty, ask the designer to include spaces (rooms) in the IFC export.
- You can keep measuring PDFs in the same estimate. Open a PDF and Take-Off is back to pages, scales and drawing tools.